Manage storage pools
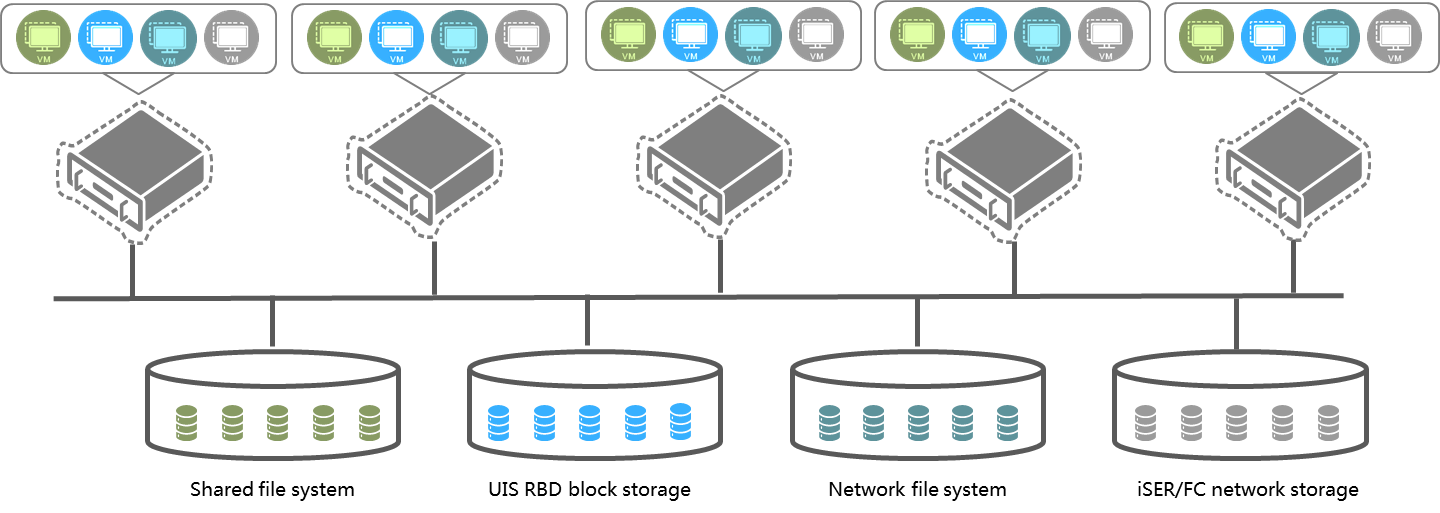
A storage pool can be used by multiple hosts in the cluster. You must deploy shared storage if you want to provide any services that require live migration of VMs, including HA, DRS, and DPM services. The use of shared storage accelerates VM migration, because VMs can be moved around the cluster without the need to move storage resources.
Figure-1 Shared storage pools
The following restrictions apply to auto VM migration:
For a network file system storage pool mounted to a host that supports auto VM migration, make sure the storage pool has the same name and source server path as the network file system storage pools mounted to other hosts in the cluster.
For an iSER network storage pool mounted to a host that supports auto VM migration, make sure the storage pool has the same name and target as the iSER network storage pools mounted to other hosts in the cluster.
For an iSCSI network storage pool mounted to a host that supports auto VM migration, make sure the storage pool has the same name and target as the iSCSI network storage pools mounted to other hosts in the cluster.
For an FC network storage pool mounted to a host that supports auto VM migration, make sure the storage pool has the same name as the FC network storage pools mounted to other hosts in the cluster and make sure the LUNs used by VMs in each FC network storage pool are the same.
To bind a network file system storage pool or FC network storage pool to multiple hosts, you must bind the storage pool to the hosts one by one. For more information, see storage pool management in the host management guide.
Restrictions and guidelines
Do not map a storage pool on UIS to a host or VM on another platform, because this operation will cause storage data conflict and might cause data corruption or loss.
Deleting a storage pool in use will cause unavailability of VMs. Before deleting a storage pool in use, verify that the storage services are not in use, and migrate VMs that you want them to continue operation to anther storage pool.
Formatting a storage pool will clear all files and data in the storage pool. Before formatting a storage pool, make sure the data in the storage pool will not be used any more.
Add a storage pool
On the top navigation bar, click Storage, and then select Storage Pools from the navigation pane.
Select a cluster from the Cluster list in the upper right corner of the page if multiple clusters exist in the system.
Click Add.
In the wizard that is launched, configure a shared storage device as described in "Parameters."
Click OK.
Refresh a storage pool
On the top navigation bar, click Storage, and then select Storage Pools from the navigation pane.
Select a cluster from the Cluster list in the upper right corner of the page if multiple clusters exist in the system.
In the storage pool list, click the Refresh icon
 for a storage pool.
Format a storage pool
Formatting a storage pool will clear all files stored on the device. Please be cautious. Make sure the storage pool will not be used any more before you formatting it.
RBD block storage pools do not need to be formatted.
To format a storage pool:
On the top navigation bar, click Storage, and then select Storage Pools from the navigation pane.
Select a cluster from the Cluster list in the upper right corner of the page if multiple clusters exist in the system.
In the storage pool list, click the Format icon
 for a storage pool.
Click OK.
View detailed information about a storage pool file
On the top navigation bar, click Storage, and then select Storage Pools from the navigation pane.
Select a cluster from the Cluster list in the upper right corner of the page if multiple clusters exist in the system.
Click the
 icon for the target storage pool.
Edit a storage pool
On the top navigation bar, click Storage, and then select Storage Pools from the navigation pane.
Select a cluster from the Cluster list in the upper right corner of the page if multiple clusters exist in the system.
Click the
 icon for the target storage pool.
Configure the parameters as described in "Parameters."
Click OK.
Delete a storage device
Deleting a storage pool will unmount the storage pool from the hosts in the cluster. The data in the storage pool will not be affected as long as the corresponding block device is not deleted.
To delete a shared storage device:
On the top navigation bar, click Storage, and then select Storage Pools from the navigation pane.
Select a cluster from the Cluster list in the upper right corner of the page if multiple clusters exist in the system.
In the storage pool list, click the Delete icon
 for a storage pool.
Click OK.
Expand a storage pool
Prerequisites
A minimum of one host is using the shared file system.
All hosts that use the shared file system are in normal state and not enabled with maintenance mode.
The storage pool state is active on all hosts that use the shared file system.
Restrictions and guidelines
The new capacity must be greater than the original capacity and cannot be greater than 64 TB.
In the current software version, only iSER, iSCSI, NVMe-oF, and FC shared file systems can be expanded.
Before expanding a shared file system that uses third-party storage resources such as 3PAR or external ONEStor, expand the block device of the shared file system on the third-party storage server. In this scenario, you do not need to specify the new capacity when expanding the shared file system in UIS.
Procedure
On the top navigation bar, click Storage, and then select Storage Pools from the navigation pane.
Select a cluster from the Cluster list in the upper right corner of the page if multiple clusters exist in the system.
Click the
 icon in the Actions column for a shared file system.
Enter the new capacity, and then click OK.
Add storage pool hosts
On the top navigation bar, click Storage, and then select Storage Pools from the navigation pane.
Select a cluster from the Cluster list in the upper right corner of the page if multiple clusters exist in the system.
Select a storage pool from the storage pool list, and then click Add Hosts on top of the list.
In the dialog box that opens, click Select Hosts.
Select hosts that will act as clients to access the shared storage, and then click OK.
Click OK.
Start the storage pools for multiple hosts
On the top navigation bar, click Storage, and then select Storage Pools from the navigation pane.
Select a cluster from the Cluster list in the upper right corner of the page if multiple clusters exist in the system.
In the bottom host list, select one or multiple hosts, click Batch Actions, and then select Start.
In the dialog box that opens, click OK.
Suspend the storage pools for multiple hosts
On the top navigation bar, click Storage, and then select Storage Pools from the navigation pane.
Select a cluster from the Cluster list in the upper right corner of the page if multiple clusters exist in the system.
In the bottom host list, select one or multiple hosts, click Batch Actions, and then select Suspend.
In the dialog box that opens, click OK.
Delete the storage pools for multiple hosts
On the top navigation bar, click Storage, and then select Storage Pools from the navigation pane.
Select a cluster from the Cluster list in the upper right corner of the page if multiple clusters exist in the system.
In the bottom host list, select one or multiple hosts, click Batch Actions, and then select Delete.
Click OK.
Parameters
Cluster: Cluster to which the storage pool belongs. This parameter is not editable and is displayed only when the system has multiple clusters. If the system has multiple clusters, you must select a cluster from the Cluster list in the upper right corner of the page before creating a storage pool.
Storage Type: Select a storage service type. To configure shared file system storage pools, select Shared Storage. To configure RBD storage pools, select UIS RBD Storage Pool.
Type: Select a shared storage type. This parameter is required when the storage type is shared storage. To access the distributed storage or an external IP SAN storage device, select the iSER Shared Directory, iSER Network Storage, iSCSI Shared Directory, or iSCSI Network Storage option. To access an FC SAN storage device, select the FC Shared Directory option. To access external NVMe devices, select the NVMe-oF Shared Directory option.
Data Pool: Select a data pool in a thin-provisioned disk pool. Make sure no block devices in the data pool are configured as shared file systems, network storage LUNs, or template pools. This parameter is required when the storage type is RBD storage pool.
Target Path: Select a point to mount the storage pool on the host. This parameter is displayed when the storage type is shared storage.
IP Address: For distributed storage, enter the iSER or iSCSI HA VIP for converged deployment and distributed deployment. For external IP SAN storage devices, enter the IP address of the IP SAN storage server. If multiple paths are available to IP SAN storage or an iSER, iSCSI, or NVMe-oF shared file system, separate each IP address by using a semicolon (;). You can add IP addresses multiple times for iSER or iSCSI network storage.
SUBNQN: Enter the globally unique NQN of a subsystem on an NVMe-oF device.
LUN: Specify a LUN for the shared file system. This field is required for an iSER or iSCSI shared directory.
Target: Configure this parameter when you create an iSER or iSCSI network storage pool. Click the
 icon to automatically obtain a target. A target can be used by only one network storage pool. The UIS distributed storage cluster has only one target.
UUID: UUID of a disk partition. This field is automatically populated after a SUBNQN is selected.
NAA: Specify the network addressing authority identifier for the LUN, which is the unique identifier of the LUN on the storage server. For an iSCSI shared directory, this field is automatically determined by the selected LUN. For an FC shared directory, you must select a LUN for this field.
Service Storage: Enable this option to allow the shared file system to be used for storing files of the VMs automatically deployed by the system. As a best practice, turn on this option. This parameter applies to shared storage. This parameter is required when the storage type is storage pool.