Manage shared file systems
In a physical environment, a LUN is directly mounted to a physical host. After you format the LUN to FAT32, NTFS, or EXT2/3/4 file system, the host can access the LUN as files.
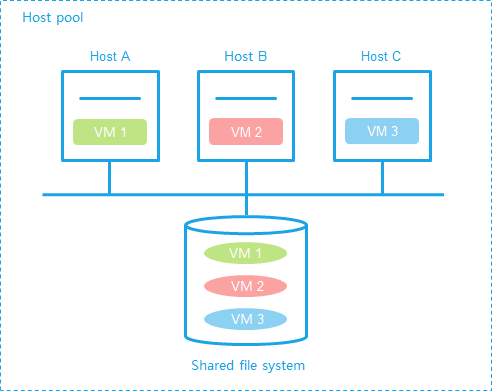
In a virtualization environment, a LUN is shared by multiple hosts. To avoid resource conflicts, you must format a LUN to a shared file system, OCFS2, for example.
The system supports iSCSI shared file systems and FC shared file systems.
A shared file system can be shared only by hosts inside a host pool.
Prerequisites
Before adding a shared file system, make sure hosts have been correctly connected to the SAN storage and LUN and mapping settings have been configured.
Before formatting a shared file system, make sure the shared file system is used by an inactive storage pool.
Before you expand a shared file system, make sure the following requirements are met:
A minimum of one host uses the shared file system as a storage pool.
All hosts that use the shared file system as a storage pool are running correctly, and the storage pools are active on the hosts.
Restrictions and guidelines
A shared file system cannot be deleted if it is being used by storage pools of hosts. To delete the shared file system, you must first delete the storage pools that use the shared file system.
Deleting a shared file system causes data loss.
If you select hardware assisted locking when formatting a file system, make sure the storage servers support CAW. You cannot use hardware assisted locking for ONEStor storage devices.
If a data pool has been specified as an RBD storage pool, storage volumes in the data pool cannot be configured as shared file systems.
Do not map a shared storage pool on CAS to a host or VM on another platform. This operation will cause storage data conflict and might cause data corruption or loss.
To avoid data loss, make sure the disk file on the shared file system is not in use before you format a shared file system.
Add a shared file system
On the top navigation bar, click Resources.
From the left navigation pane, select Compute > Host Pool Name.
Click the Shared File Systems tab.
Click Add.
Click OK.
Edit a shared file system
On the top navigation bar, click Resources.
From the left navigation pane, select Compute > Host Pool Name.
Click the Shared File Systems tab.
Click Edit in the Actions column for the target shared file system.
Configure the parameters as described in "Parameters."
If a shared file system is being used by storage pools, only the alias, description, and service storage state are configurable.
Click OK.
Format a shared file system
On the top navigation bar, click Resources.
From the left navigation pane, select Compute > Host Pool Name.
Click the Shared File Systems tab.
Click More in the Actions column for the target shared file system, and then select Disk Formatting.
Click OK.
Configure the parameters as described in "Parameters."
Click OK.
Delete a shared file system
On the top navigation bar, click Resources.
From the left navigation pane, select Compute > Host Pool Name.
Click the Shared File Systems tab.
Click Delete in the Actions column for the target shared file system.
In the dialog box that opens, click OK.
Expand a shared file system
On the top navigation bar, click Resources.
From the left navigation pane, select Compute > Host Pool Name.
Click the Shared File Systems tab.
Click More in the Actions column for the target shared file system, and then select Scale Up Storage Pool (Time-Consuming).
In the dialog box that opens, click OK.
Display detailed storage file information
On the top navigation bar, click Resources.
From the left navigation pane, select Compute > Host Pool Name.
Click the Shared File Systems tab.
Click More in the Actions column for the target shared file system, and then select View Storage File Details.
Parameters
Add or edit a shared file system:
Type: Select a shared file system type based on the storage server type. Options include iSCSI Shared File System and FC Shared File System.
Target Path: Enter the mount point of the shared file system on the host.
IP Address: Enter the IP address of the IP SAN storage server. This parameter is required for an iSCSI shared file system.
LUN: Select a LUN for the shared file system. This parameter is required for an iSCSI shared file system.
NAA: Select an NAA for the shared file system. This parameter is required for an FC shared file system. The NAA of an iSCSI shared file system is determined by the LUN.
Service Storage: Enable service storage to enable automatically deployed VMs to use the shared file system.
Format a shared file system:
Max Access Nodes: Set the maximum number of storage pools that can use the shared file system. The maximum value for this parameter is 64.
Cluster Size: Set the smallest amount of disk space that can be used to store a file. If a file is larger than a disk cluster, it is stored in multiple disk clusters. If a file is smaller than a disk cluster, it is stored in a dedicated disk cluster. A shared file system is mainly used to store VM image files. As a best practice, set the value of this parameter as large as possible to enhance disk read performance and save disk space.
Locking Type: Select a locking type.
Distributed Locking—Distributed locking replies on the network to provide nodes with exclusive access to shared storage. With distributed locking enabled, hosts cannot access the storage if they do not have network connectivity to one another.
Hardware Assisted Locking—Hardware assisted locking saves lock information in a lock area on each disk to enable exclusive access of nodes to shared storage. This locking type does not require hosts to have network connectivity to one another. The hosts can access the storage as long as they have connectivity to the storage cluster.
Display shared file systems:
Total: Total storage size.
Allocated: Total storage size that is allocated to VM disks.