Modify system parameters
Modify the /etc/sysctl.conf file
Add the following lines to the end of the file.
|
|
Determine the value of kernel.shmmax based on the VM memory size. For example, if the VM memory is 160 GB, the kernel.shmmax value should be 70% of the VM memory, which is 120259084288 bits (160 × 70% × 1024 × 1024 × 1024). |
kernel.shmall = 4294967296
kernel.shmmax = 120259084288
fs.aio-max-nr = 1048576
kernel.shmmni = 4096
kernel.sem = 250 32000 100 128
net.ipv4.ip_local_port_range = 9000 65500
net.core.rmem_default = 4194304
net.core.rmem_max = 4194304
net.core.wmem_default = 262144
net.core.wmem_max = 1048576
fs.file-max=6815744
Modify the limits.conf file
Execute the vi /etc/security/limits.conf command and add the following lines.
oracle soft nproc 2047
oracle hard nproc 16384
oracle soft nofile 1024
oracle hard nofile 65536
grid soft nproc 2047
grid hard nproc 16384
grid soft nofile 1024
grid hard nofile 65536
Modify the login file
Execute the vi /etc/pam.d/login command and add the following lines.
session required pam_selinux.so open
session optional pam_keyinit.so force revoke
session required pam_limits.so
session required pam_namespace.so
Modify the /etc/profile file
Execute the vi /etc/profile command, add the following lines, and then execute the sysctl –p command.
if [ $USER = "oracle" ] || [ $USER = "grid" ]; then
if [ $SHELL = "/bin/ksh" ]; then
ulimit -p 16384
ulimit -n 65536
else
ulimit -u 16384 -n 65536
fi
fi
Configure HugePages
HugePages locks SGA in the VM memory to avoid SGA system page table lookups.
Verify that the HugePage size is 2048 KB.
cat /proc/meminfo |grep Hugepagesize
Hugepagesize: 2048 kB
Determine the value of vm.nr_hugepages, which is the value of sga_max_size (memory size allocated to SGA) plus 2 GB.
vm.nr_hugepages = (VM memory size × 0.65 × 0.75 + 2) × 1024/HugePage size
If the VM memory size is 32 GB, and the HugePages size is in MB, the value of vm.nr_hugepages is 40960.
Add the following line to the end of the /etc/sysctl.conf file.
Validate the configuration changes.
sysctl -p
sysctl -a|grep nr_hugepages
vm.nr_hugepages = 40960
vm.nr_hugepages_mempolicy = 40960
Disable SELinux and the firewall
Disable SELinux.
sed -i "s/SELINUX=enforcing/SELINUX=disable/" /etc/selinux/config
setenforce 0
getenforce
Disable the firewall.
service iptables stop
chkconfig iptables off
Create the Oracle installation directory
Create the Oracle installation directory and configure permissions and user or user group ownership of some folders.
mkdir -p /u01/app/12.2.0/grid
mkdir -p /u01/app/grid
mkdir -p /u01/app/oracle/product/12.2.0/db
chown -R grid:oinstall /u01/app
chown -R oracle:oinstall /u01/app/oracle
chmod -R 775 /u01/
Create ASM shared volumes
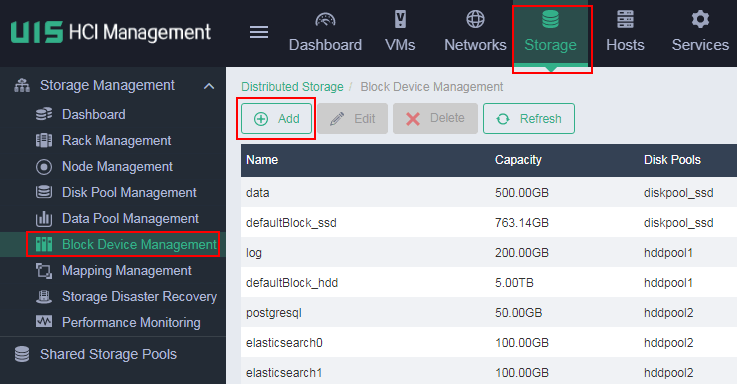
Log in to UIS.
On the top navigation bar, click Storage, and then select Storage Management > Block Device Management from the navigation pane.
Click Add.
Figure-1 Adding a block device
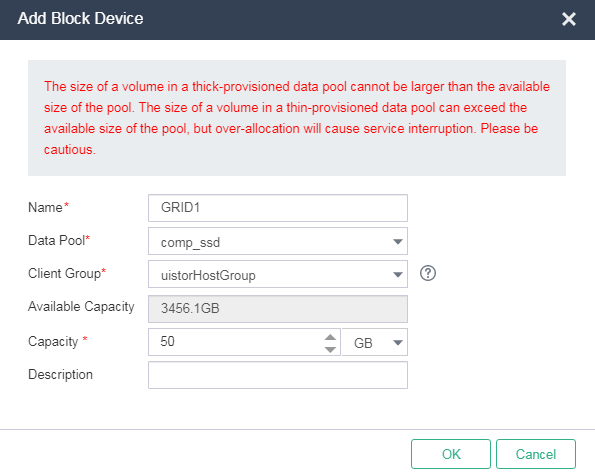
Configure the block device as planned in "RAC shared storage volume planning,", and then click OK.
Figure-2 Configuring a block device
Repeat steps 3 and 4 to create all storage volumes.
Mount the storage volumes to the target VMs.
Ignore the prompts when you mount the same storage volume to the VMs.
Configure an ASM disk group
This best practice configures ASM disks by using Oracle ASMLib.
To configure an ASM disk group:
Install RPM packages.
rpm -ivh oracleasm-support-2.1.8-1.el6.x86_64.rpm
rpm -ivh kmod-oracleasm-2.0.6.rh1-3.el6.x86_64.rpm
rpm -ivh oracleasmlib-2.0.4-1.el6.x86_64.rpm
Configure the Oracle ASM library driver.
Execute the /usr/sbin/oracleasm configure -I command.
Configure the driver as follows.

Execute the following commands.
/etc/init.d/oracleasm start
/etc/init.d/oracleasm status
Verify that the logical and physical sectors of volumes are not 4 KB.
blockdev --getss /dev/sda
blockdev --getpbsz /dev/sda
Execute the fdisk /dev/vdx command on one VM to assign all storage volumes planned in "RAC shared storage volume planning" to vdx as a primary partition.
Create an ASM disk on the VM in step 5.
/etc/init.d/oracleasm createdisk VOL1 /dev/vdx1
Execute the following command on the other VMs.
/etc/init.d/oracleasm scandisks
Upload Oracle and Grid installation packages
Upload the Grid and Oracle installation packages as the root user to u01/app/12.2.0/grid and /home/oracle on one node, respectively.
Upcompress the installation packages.
Edit the attributes of the files and directories.
chown -R grid:oinstall /u01/app/12.2.0/grid/
chown -R oracle:oinstall /home/oracle/database/
Copy the RPM package in /u01/app/12.2.0/grid/cv/rpm to the other nodes.
Edit the attributes of the file and directory.
Install Xmanager on your local PC and open Xmanager > Passive.
On UIS, you can deploy a Windows VM as a local PC for database installation and performance testing.