- Table of Contents
-
- H3C S3100-52P Ethernet Switch Operation Manual-Release 1500(V1.02)
- 00-1Cover
- 00-2Overview
- 01-CLI Operation
- 02-Login Operation
- 03-Configuration File Management Operation
- 04-VLAN Operation
- 05-IP Address and Performance Confiugration Operation
- 06-GVRP Operation
- 07-Port Basic Configuration Operation
- 08-Link Aggregation Operation
- 09-Port Isolation Operation
- 10-DLDP Operation
- 11-MAC Address Table Operation
- 12-MSTP Operation
- 13-Multicast Operation
- 14-Routing Protocol Operation
- 15-802.1x Operation
- 16-AAA-RADIUS-HWTACACS Operation
- 17-Centralized MAC Address Authentication Operation
- 18-DHCP Operation
- 19-ARP Operation
- 20-ACL Operation
- 21-QoS Operation
- 22-Mirroring Operation
- 23-Cluster Operation
- 24-SNMP and RMON Operation
- 25-NTP Operation
- 26-SSH Terminal Service Operation
- 27-File System Management Operation
- 28-FTP and TFTP Operatio
- 29-Information Center Operation
- 30-System Maintenance and Debugging Operation
- 31-VLAN VPN Operation
- 32-HWPing Operation
- 33-DNS Operation
- 34-Appendix
- Related Documents
-
| Title | Size | Download |
|---|---|---|
| 26-SSH Terminal Service Operation | 5.86 MB |
Chapter 1 SSH Terminal Service
1.1.2 SSH Server Configuration
1.1.3 SSH Client Configuration
1.1.4 Configuring the Device as an SSH Client
1.1.5 Displaying SSH Configuration
1.1.6 SSH Server Configuration Example
1.1.7 Configuring the Device as an SSH Client Configuration Example
1.2.2 SFTP Server Configuration
1.2.3 SFTP Client Configuration on the Switch
1.2.4 SFTP Configuration Example
Chapter 1 SSH Terminal Service
1.1 SSH Terminal Service
1.1.1 Introduction to SSH
Secure shell (SSH) provides secure communication and powerful authentication for remote user login to a switch over an insecure network, thus preventing assaults such as IP address spoofing, plain-text password interception.
Currently, the S3100-52P Ethernet Switches support SSH2.0. Acting as an SSH server, a switch allows for the connections of multiple SSH clients. Through SSH Client, a user can establish a connection to a switch or UNIX host running SSH Server.
Figure 1-1 and Figure 1-2 shows two ways to establish SSH connection between client and server.
l Establishing SSH connection through a LAN
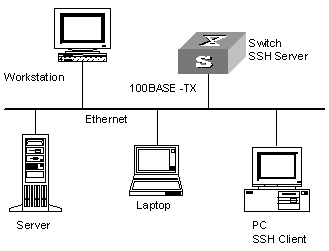
Figure 1-1 Establish SSH connection through a LAN
l Establishing SSH connection through a WAN

Figure 1-2 Establish SSH connection through a WAN
The communication process between a SSH client and server goes through the following five stages.
1) Version negotiation stage:
l The client sends a TCP connection request to the server.
l When a TCP connection is established, the two ends begin to negotiate an SSH version.
l If they get a successful negotiation, they go to the key negotiation stage. Otherwise the server terminates the TCP connection.
2) Key negotiation stage:
l The server sends the public key in a randomly generated RSA key pair to the client.
l The client calculates a session key by using the public key received from the server and a random number it generates randomly.
l The client encrypts the random number with the public key from the server and sends the result data to the server.
l The server then decrypts the received data with the private key in the RSA key pair to get the random number on the client.
l The server calculates a session key by using the public key and the random number through the same algorithm as the client.
Then, the server and the client get the same session key, and use it for data encryption and decryption to secure their subsequent communication.
3) Authentication negotiation stage:
l The client sends its username information to the server.
l The server starts to authenticate the user. If the user is configured as having no authentication on the server, the following step is skipped and the session request stage starts directly.
l The server authenticates the user in some way (see the following note), till the authentication succeeds or the connection is terminated due to authentication timeout.
& Note:
SSH provides two kinds of authentication: password authentication and RSA authentication.
(1) Password authentication works as follows:
l The client sends the username and password to the server.
l The server compares the received username and password against those configured locally. The user passes the authentication if the server finds a match for both username and password.
(2) RSA authentication works as follows:
l Configure the RSA public key of the client at the server.
l The client sends the member module of its RSA public key to the server.
l The server checks the validity of the member module. If it is valid, the server generates a random number, which is sent to the client after being encrypted with RSA public key of the client.
l Both the server and the client calculate authentication data by using the random number and session ID.
l The client sends the authentication data it calculates to the server.
l The server compares the received authentication data with the authentication data on itself. If they are identical, the authentication succeeds.
4) Session request stage. The client sends a session request to the server, which processes the request and establish a session.
5) Interactive session stage. Both ends exchange data till the session ends.
1.1.2 SSH Server Configuration
The following table describes SSH Server configuration tasks.
Table 1-1 SSH2.0 Server configuration tasks
|
Operation |
Command |
Related section |
|
Configure user interface(s) to support specified protocol(s) |
protocol inbound |
Section “Configuring user interface(s) to support specified protocol(s)" |
|
Generate local RSA key pair |
rsa local-key-pair create |
|
|
Destroy local RSA key pair |
rsa local-key-pair destroy |
|
|
Specify a default authentication type for SSH users |
ssh authentication-type default |
|
|
Configure authentication type for an SSH user |
ssh user username authentication-type |
|
|
Set SSH authentication timeout time |
ssh server timeout |
Section “Configuring SSH management |
|
Set SSH authentication retry times |
ssh server authentication-retries |
|
|
Configure a client public key for an SSH user |
ssh user username assign rsa-key keyname |
I. Configuring user interface(s) to support specified protocol(s)
Table 1-2 Configure user interface(s) to support specified protocol(s)
|
Operation |
Command |
Description |
|
Enter system view |
system-view |
— |
|
Enter the view of one or multiple user interfaces |
user-interface [ type-keyword ] number [ ending-number ] |
Required |
|
Configure the user interface(s) to support specified protocol(s) |
protocol inbound { all |ssh | telnet } |
Optional By default, both Telnet and SSH are supported. |
![]() Caution:
Caution:
l If you have configured a user interface to support SSH protocol, to ensure a successful login to the user interface, you must configure AAA authentication for the user interface by using the authentication-mode scheme command.
l For a user interface, if you have executed the authentication-mode password or authentication-mode none command, the protocol inbound ssh command cannot be executed; if you have executed the protocol inbound ssh command, neither of the authentication-mode password and authentication-mode none commands can be executed.
II. Generating or destroying local RSA key pair
This configuration task is used to generate or destroy an RSA key pair on the server, which is named in the format of switch name plus "_Host", for example, H3C_host.
After you issue the rsa local-key-pair create command, the system prompts you to input a key length.
In SSH2.0, the key length is in the range of 512 to 2,048 (bits).
Table 1-3 Generate or destroy local RSA key pair
|
Operation |
Command |
Description |
|
Enter system view |
system-view |
— |
|
Generate local RSA key pair |
rsa local-key-pair create |
Required |
|
Destroy local RSA key pair |
rsa local-key-pair destroy |
Optional |
![]() Caution:
Caution:
l For a successful SSH login, you must first generate the RSA key pair of the server.
l You just need to execute the rsa local-key-pair create command once, and need not execute the command again after the system is rebooted.
l If you re-execute the rsa local-key-pair create command, the system will ask whether you want to replace the original key pair with a new one.
& Note:
After the rsa local-key-pair create command is executed, you can execute the display rsa local-key-pair public command to display information about the public key (in H3C_host, for example).
III. Configuring authentication type for a user
For a new user, you must specify the authentication type. Otherwise, the user cannot access the switch.
Table 1-4 Configure authentication type for a user
|
Operation |
Command |
Description |
|
Enter system view |
system-view |
— |
|
Specify a default authentication type for SSH users |
ssh authentication-type default { password | rsa | password-publickey | all } |
At least one required; By default, no authentication type is specified for an SSH user, and the user can not access the switch. |
|
Configure authentication type for an SSH user |
ssh user username authentication-type { password | password-publickey | rsa| all } |
Note that:
l The ssh authentication-type default command is used to configure the default authentication type for all SSH users.
l The ssh user username authentication-type command is used to configure an authentication type for a specific SSH user.
l When both commands are configured with different authentication types, for the specific user (user specified by the username argument), the authentication type specified by the ssh user username authentication-type command will take effect instead of that specified for all SSH users.
![]() Caution:
Caution:
l If RSA authentication type is configured for a user, the RSA public key of the client user must be configured on the switch.
l By default, no authentication type is specified for a new user, and the new user cannot access the switch.
l For the password-publickey authentication type, users can access the switch only when they pass both kinds of authentications.
l For the password authentication type, username should be consistent with the valid user name defined in AAA; for the RSA authentication type, username is the SSH local user name, so that there is no need to configure a local user in AAA.
l If the default authentication type for SSH users is password and local AAA authentication is adopted, you need not use the ssh user command to create an SSH user. Instead, you can use the local-user command to create a user name and its password and then set the service type of the user to SSH.
l If the default authentication type for SSH users is password and remote authentication (RADIUS authentication, for example) is adopted, you need not use the ssh user command to create an SSH user, because it is created on the remote server. And the user can use its username and password configured on the remote server to access the network.
IV. Configuring SSH management
The configuration of SSH management includes the setting of authentication timeout time, and authentication retry times. After the configuration, the SSH management function is able to prevent illegal activities such as malicious password guessing, thus ensure the security of SSH connections.
Table 1-5 Configure SSH management
|
Operation |
Command |
Description |
|
Enter system view |
system-view |
— |
|
Set SSH authentication timeout time |
ssh server timeout seconds |
Optional By default, the timeout time is 60 seconds. |
|
Set SSH authentication retry times |
ssh server authentication-retries times |
Optional By default, the number of retry times is 3. |
V. Configuring a client public key for a user
On the switch, you can configure a client public key (generated randomly on a client) for a client user. This configuration is not required for password authentication type.
There are two methods to configure a client public key for a user.
1) Manual configuration
First, perform the following operations on a client:
l Use the SSH2.0 client software to randomly generate a RSA key pair.
l Use the SSHKEY.exe program to transform the public key in the RSA key pair to PKCS (public-key cryptography standards) format.
Then, perform the following operations on the server:
Table 1-6 Configure client public key for a user
|
Operation |
Command |
Description |
|
Enter system view |
system-view |
— |
|
Enter public key view |
rsa peer-public-key key-name |
Required |
|
Enter public key edit view to input a client public key |
public-key-code begin |
When you input the key data, spaces are allowed between the characters you input (because the system can remove the spaces automatically); you can also press <Enter> to continue your input at the next line. But the key you input should be a hexadecimal digit string coded in the public key format. |
|
Return to public key view from public key edit view |
public-key-code end |
The system saves the public key data you input when exiting public key edit view. |
|
Return to system view from public key view |
peer-public-key end |
— |
|
Assign a client public key to an SSH user |
ssh user username assign rsa-key keyname |
Required Keyname is the name of an existing public key. If the user has already been assigned with a public key, the newly assigned public key overwrites the old one. |
& Note:
The above method requires you to transform the format of the public key on the client, and then manually configure the transformed public key on the server. So, the method is relatively more complex.
First, perform the following operations on a client:
l Use the SSH2.0 client software to randomly generate a RSA key pair.
l Use FTP/TFTP to transfer the corresponding public key file to the Flash memory of the server.
Then, perform the following operations on the server:
Table 1-7 Automatic configuration
|
Operation |
Command |
Description |
|
Enter system view |
system-view |
— |
|
Transform the format of the key in a client public key file and automatically configure a client public key on the server |
rsa peer-public-key key-name import sshkey file-name |
filename must be consistent with the name of a public key file in the Flash memory. |
& Note:
The above method does not require you to manually configure a public key. So the method is relatively simple and is the recommended method.
VI. Specifying a source IP address/interface for the SSH server
You can perform the following configurations to specify a source IP address or a source interface for the SSH server, thus enhancing traffic manageability.
Table 1-8 Specify a source IP address/interface for the SSH server
|
Operation |
Command |
Description |
|
Enter system view |
system-view |
— |
|
Specify a source IP address for the SSH server |
ssh-server source-ip ip-address |
Optional |
|
Specify a source interface for the SSH server |
ssh-server source-interface interface-type interface-number |
Optional |
1.1.3 SSH Client Configuration
A variety of SSH client software are available, such as PuTTY and FreeBSD. For an SSH client to establish a connection with an SSH server, you must complete these configuration tasks:
l Specifying the IP address of the server
l Selecting the protocol for remote connection Usually, a client can use a variety of remote connection protocols, such as Telnet, Rlogin, SSH. To establish an SSH connection, you must select SSH.
l Selecting the SSH version Since the device supports SSH Server 2.0 now, select 2.0 or lower for the client.
l Specifying the RSA private key file. The RSA keys for an SSH user include a public key and a private key, which are generated by the tool accompanied with the client software. The public key must be configured on the server, while the private key must be configured on the client.
The following takes the client software of PuTTY, PuTTYGen and SSHKEY as examples to illustrate how to configure the SSH client:
I. Generating the Client Key
To generate the client key pair, run PuTTYGen.exe, choose “SSH2(RSA)” in the parameter field and click “Generate”.
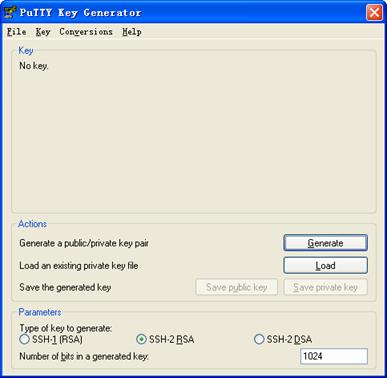
Figure 1-3 Generating the client key (1)
While generating the key pair, you must move the mouse continuously. The mouse should be restricted off the green process bar in the blue box of Figure 1-4. Otherwise, the process bar does not move and the key pair cannot be generated.
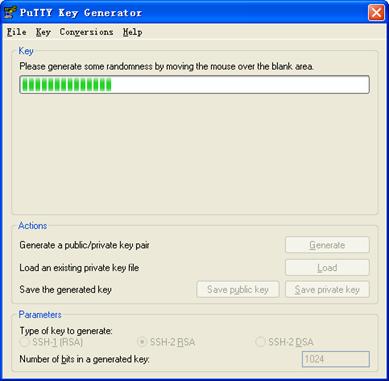
Figure 1-4 Generating the client key (2)
After the key pair is generated, click “Save public key” and enter the file name (public for here) to save the key pair.
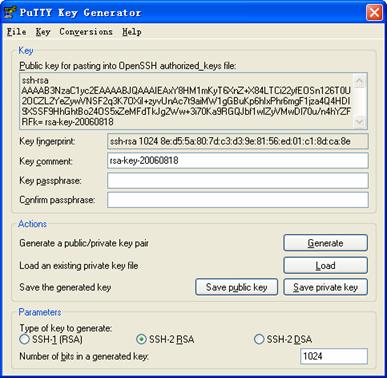
Figure 1-5 Generating the client key (3)
Likewise, to save a private key, click “Save private key” and a warning window pops up to prompt you whether to save a private key without any precautions. Click “Yes” and enter a name (private for here) to save the private key.

Figure 1-6 Generating the client key (4)
To generate RSA public key in PKCS format, run SSHKEY.exe, click “Browse” and select the public key file, and then click “Convert”.
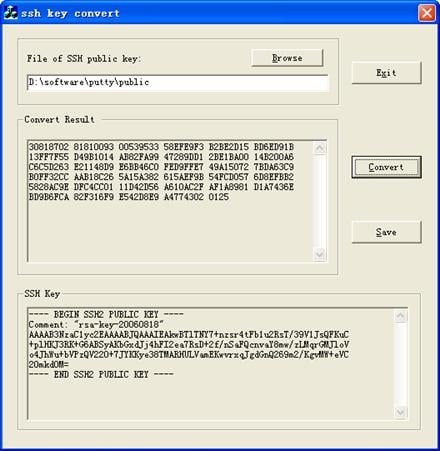
Figure 1-7 Generating the client key (5)
II. Specifying the IP address of the server
Launch PuTTY.exe and the following window appears.
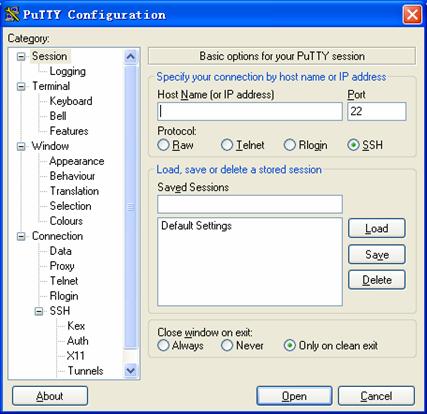
Figure 1-8 SSH client interface 1
In the [Host Name (or IP address)] text box, enter the IP address of the server, for example, 10.110.28.10. Note that the IP address can be the IP address of any interface on the server that has SSH in the state of up and a route to the client.
III. Selecting the protocol for remote connection
As shown in Figure 1-8, select the [SSH] option from the [Protocol] section.
IV. Selecting the SSH version
From the category on the left of the window, click [Connection/SSH]. The window as shown in Figure 1-9 appears.
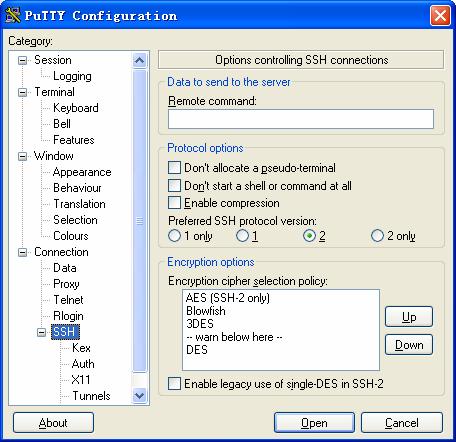
Figure 1-9 SSH client interface 2
In the [Protocol options] field, select [2] from the [Preferred SSH protocol version] section.
V. Open an SSH Connection with RSA
If the client needs to use RSA authentication, you must specify the RSA private key file. If the client needs to use password authentication, this is not required.
From the category on the left of the window, click [Connection/SSH/Auth]. The following window appears.
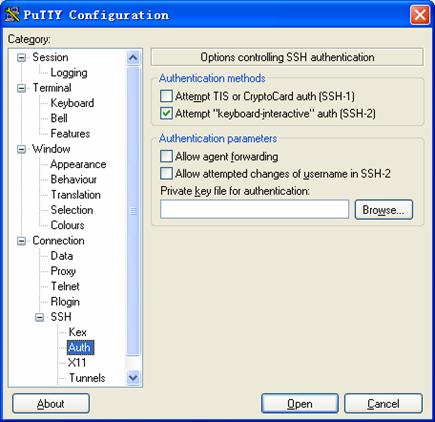
Figure 1-10 SSH client interface 3
Click <Browse…> to bring up the file selection window, navigate to the private key file and click <OK>.
VI. Open an SSH Connection with Password
1) Click <Open>. The following SSH client interface appears. If the connection is normal, you will be prompted to enter the username and password, as shown in Figure 1-11.
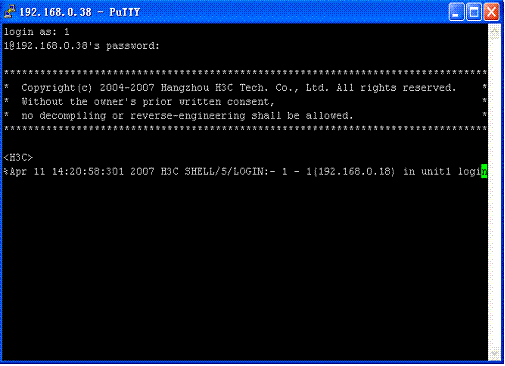
Figure 1-11 SSH client interface
2) Enter the username and password to create an SSH connection.
3) To log out, enter the quit command.
1.1.4 Configuring the Device as an SSH Client
The following table describes SSH Client configuration tasks.
Table 1-9 SSH Client configuration tasks
|
Operation |
Command |
Description |
|
Enter system view |
system-view |
— |
|
Enable the client to run initial authentication |
ssh client first-time enable |
Optional By default, the client is enabled to run initial authentication. If the client is disabled from running initial authentication, you must assign a public key to the server on the client. |
|
Assign a public key to a server |
ssh client server-ip assign rsa-key keyname |
Optional This command is used to configure the public key of a server on the client, so that the client can regard the server as a reliable server when it connects to the server. |
|
Start the client to establish a connection with an SSH server |
ssh2 { host-ip | host-name } [ port-num ] [ prefer_kex { dh_group1 | dh_exchange_group } ] [ prefer_ctos_cipher { des | aes128 } ] [ prefer_stoc_cipher { des | aes128 } ] [ prefer_ctos_hmac { sha1 | sha1_96 | md5 | md5_96 } ] [ prefer_stoc_hmac { sha1 | sha1_96 | md5 | md5_96 } ] |
Required In this command, you can also specify the preferred key exchange algorithm, encryption algorithms and HMAC algorithms between the server and client. HMAC: Hash-based message authentication code |
& Note:
If an SSH client is enabled to run initial authentication, when the SSH client accesses an SSH server for the first time and it does not have the public key of the server, the client allows you to select to continue the access and save the public key of the server to local device; when the client accesses the server at the next time, it authenticates the server against the public key saved locally.
I. Specifying a source IP address/interface for the SSH client
You can perform the following configuration to specify a source IP address or a source interface for the SSH2.0 client, thus enhancing traffic manageability.
Table 1-10 Specify a source IP address/interface for the SSH client
|
Operation |
Command |
Description |
|
Enter system view |
system-view |
— |
|
Specify a source IP address for the SSH2.0 client. |
ssh2 source-ip ip-address |
Optional |
|
Specify a source interface for the SSH2.0 client |
ssh2 source-interface interface-type interface-number |
Optional |
1.1.5 Displaying SSH Configuration
After the above configuration, you can execute the display command in any view to display the configuration information and running status of SSH, so as to verify your configuration.
Table 1-11 Display SSH configuration
|
Operation |
Command |
Description |
|
Display host and server public keys |
display rsa local-key-pair public |
You can execute the display command in any view. |
|
Display client RSA public key(s) |
display rsa peer-public-key [ brief | name keyname ] |
|
|
Display SSH status and session information |
display ssh server { status | session } |
|
|
Display SSH user information |
display ssh user-information [ username ] |
|
|
Display the current source IP address or the IP address of the source interface specified for the SSH server. |
display ssh-server source-ip |
|
|
Display the current source IP address specified for the SSH2.0 Client. |
display ssh2 source-ip |
1.1.6 SSH Server Configuration Example
I. Network requirements
As shown in Figure 1-12, The PC (SSH Client) running an SSH2.0-supported client software, establish a local connection with the switch (SSH Server) to ensure the security of data exchange.
II. Network diagram
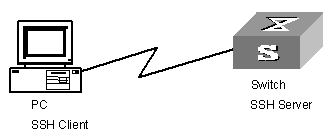
Figure 1-12 Network diagram for SSH server configuration
III. Configuration procedure
1) Generate local RSA key pair.
<H3C>system-view
[H3C] rsa local-key-pair create
& Note:
If local RSA key pair has already been generated previously, you can skip this step.
2) Set user authentication method.
Settings for the two authentication types are described respectively in the following:
l Password authentication
# Set AAA authentication on user interfaces.
[H3C] user-interface vty 0 4
[H3C-ui-vty0-4] authentication-mode scheme
# Configure the user interfaces to support SSH.
[H3C-ui-vty0-4] protocol inbound ssh
# Set login protocol to SSH, authentication type to password, and authentication password to "abc" for user clinet001.
[H3C] local-user client001
[H3C-luser-client001] password simple abc
[H3C-luser-client001] service-type ssh
[H3C-luser-client001] quit
[H3C] ssh user client001 authentication-type password
& Note:
You can use the default SSH authentication timeout time and authentication retry times. After the above settings, run the SSH2.0-supported client software on a host connected to the switch, and log into the switch with the username client001 and password "abc".
l RSA public key authentication
# Set AAA authentication on the user interfaces.
[H3C] user-interface vty 0 4
[H3C-ui-vty0-4] authentication-mode scheme
# Set the user interfaces to support SSH.
[H3C-ui-vty0-4] protocol inbound ssh
# Set login protocol to SSH and authentication type to RSA for user client002.
[H3C] ssh user client002 authentication-type rsa
# On the SSH2.0 client, make the client software generate a random RSA key pair, and transfer the public key in the pair from the client to the server.
# Configure the client public key on the server, with a key name of H3C002.
[H3C] rsa peer-public-key H3C002
[H3C-rsa-public-key] public-key-code begin
[H3C-rsa-key-code] 308186028180739A291ABDA704F5D93DC8FDF84C427463
[H3C-rsa-key-code] 1991C164B0DF178C55FA833591C7D47D5381D09CE82913
[H3C-rsa-key-code] D7EDF9C08511D83CA4ED2B30B809808EB0D1F52D045DE4
[H3C-rsa-key-code] 0861B74A0E135523CCD74CAC61F8E58C452B2F3F2DA0DC
[H3C-rsa-key-code] C48E3306367FE187BDD944018B3B69F3CBB0A573202C16
[H3C-rsa-key-code] BB2FC1ACF3EC8F828D55A36F1CDDC4BB45504F020125
[H3C-rsa-key-code] public-key-code end
[H3C-rsa-public-key] peer-public-key end
[H3C] ssh user client002 assign rsa-key H3C002
# Make corresponding configuration on the host keeping the RSA private key and start the SSH client software to establish an SSH connection.
1.1.7 Configuring the Device as an SSH Client Configuration Example
I. Network requirements
As shown in Figure 1-13:
l Switch A serves as an SSH client, with a user name of client003.
l Switch B serves as an SSH server, with an IP address of 10.165.87.136.
II. Network diagram
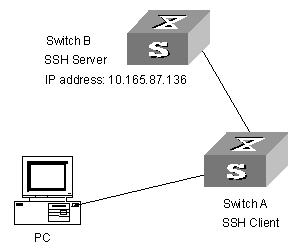
Figure 1-13 Network diagram for SSH client configuration
III. Configuration procedure
1) Enable the client to run initial authentication.
[H3C] ssh client first-time enable
2) Configure the server's public key on the client.
[H3C] rsa peer-public-key public
[H3C-rsa-public-key] public-key-code begin
[H3C-rsa-key-code] 308186028180739A291ABDA704F5D93DC8FDF84C427463
[H3C-rsa-key-code] 1991C164B0DF178C55FA833591C7D47D5381D09CE82913
[H3C-rsa-key-code] D7EDF9C08511D83CA4ED2B30B809808EB0D1F52D045DE4
[H3C-rsa-key-code] 0861B74A0E135523CCD74CAC61F8E58C452B2F3F2DA0DC
[H3C-rsa-key-code] C48E3306367FE187BDD944018B3B69F3CBB0A573202C16
[H3C-rsa-key-code] BB2FC1ACF3EC8F828D55A36F1CDDC4BB45504F020125
[H3C-rsa-key-code] public-key-code end
[H3C-rsa-public-key] peer-public-key end
[H3C] ssh client 10.165.87.136 assign rsa-key public
3) Start SSH Client.
Settings for the two authentication types are described respectively in the following:
l Password authentication
# Start SSH Client with default encryption algorithms.
[H3C] ssh2 10.165.87.136
username: client003
Trying 10.165.87.136
Press CTRL+K to abort
Connected to 10.165.87.136...
The Server is not autherncated.Do you continue access it?(Y/N):y
Do you want to save the server's public key?(Y/N):y
Enter password:
**************************************************************************
* Copyright(c) 2004-2007 Hangzhou H3C Tech. Co., Ltd. All rights reserved.*
* Without the owner's prior written consent, *
* no decompiling or reverse-engineering shall be allowed. *
**************************************************************************
<H3C>
l RSA public key authentication
# Start SSH Client with defined encryption algorithms.
[H3C] ssh2 10.165.87.136 22 perfer_kex dh_group1 perfer_ctos_cipher des perfer_ctos_hmac md5 perfer_stoc_hmac md5
username: client003
Trying 10.165.87.136...
Press CTRL+K to abort
Connected to 10.165.87.136...
The Server is not autherncated.Do you continue access it?(Y/N):y
Do you want to save the server's public key?(Y/N):y
**************************************************************************
* Copyright(c) 2004-2007 Hangzhou H3C Tech. Co., Ltd. All rights reserved.*
* Without the owner's prior written consent, *
* no decompiling or reverse-engineering shall be allowed. *
**************************************************************************
<H3C>
1.2 SFTP Service
1.2.1 Introduction to SFTP
Secure FTP (SFTP) is a new feature introduced in SSH2.0.
Since SFTP is based on SSH, it can provides security for remote users to log into the switch and perform file management and transfer operations (such as system update), thus providing more security for data transfer. Through the SFTP client function, you can securely log into a remote device and perform file transfer operations securely.
1.2.2 SFTP Server Configuration
The following sections describe SFTP Server configuration tasks:
l Configuring service type for an SSH user
l Setting connection idle timeout
I. Configuring service type for an SSH user
Table 1-12 Configure service type for an SSH user
|
Operation |
Command |
Description |
|
Enter system view |
system-view |
— |
|
Configure service type for an SSH user |
ssh user username service-type { stelnet | sftp | all } |
Optional By default, the service type available for a user is stelnet. |
II. Enabling SFTP Server
|
Operation |
Command |
Description |
|
Enter system view |
system-view |
— |
|
sftp server enable |
Required By default, SFTP Server is disabled. |
III. Setting connection idle timeout time
You can set the idle timeout time for SFTP connections, so that the system can automatically release a user connection when the user connection is idle for a time longer than the time threshold you set.
Table 1-14 Set connection idle timeout time
|
Operation |
Command |
Description |
|
Enter system view |
system-view |
— |
|
Set idle timeout time for SFTP connections |
sftp timeout time-out-value |
Required By default, the connection idle timeout time is 10 minutes. |
1.2.3 SFTP Client Configuration on the Switch
The following table describes SFTP Client configuration tasks on the switch:
Table 1-15 SFTP Client configuration tasks
|
Operation |
Command Keyword |
View |
Description |
|
|
Start SFTP Client |
sftp |
System view |
Required |
|
|
Stop SFTP Client |
bye |
SFTP client view |
Optional |
|
|
exit |
||||
|
quit |
||||
|
SFTP directory operations |
Change the current directory |
cd |
SFTP client view |
Optional |
|
Return to the upper directory |
cdup |
|||
|
Display the current directory |
pwd |
|||
|
Display the file list in a directory |
dir |
|||
|
ls |
||||
|
Create a new directory |
mkdir |
|||
|
Delete a directory |
rmdir |
|||
|
SFTP file operations |
Rename a file on the remote SFTP server |
rename |
SFTP client view |
Optional |
|
Download a file from the remote SFTP server |
get |
|||
|
Upload a local file to the remote SFTP server |
put |
|||
|
Display the file list in a directory |
dir |
|||
|
ls |
||||
|
Delete a file from the SFTP server |
delete |
|||
|
remove |
||||
|
Get help information about SFTP client commands |
help |
SFTP client view |
Optional |
|
I. Starting SFTP Client
You can start SFTP Client to establish a connection to a remote SFTP server and enter STP client view.
|
Operation |
Command |
Description |
|
Enter system view |
system-view |
— |
|
Start SFTP Client |
sftp { host-ip | host-name } [ port-num ] [ prefer_kex { dh_group1 | dh_exchange_group } ] [ prefer_ctos_cipher { des | aes128 } ] [ prefer_stoc_cipher { des | aes128 } ] [ prefer_ctos_hmac { sha1 | sha1_96 | md5 | md5_96 } ] [ prefer_stoc_hmac { sha1 | sha1_96 | md5 | md5_96 } ] |
Required |
II. Stopping SFTP Client
|
Operation |
Command |
Description |
|
Enter system view |
system-view |
— |
|
Enter SFTP client view |
sftp { host-ip | host-name } |
— |
|
Stop SFTP Client |
bye |
The three commands have the same function. |
|
exit |
||
|
quit |
III. Performing SFTP directory operations
SFTP directory operations include: changing or displaying the current directory, creating or deleting a directory, displaying file or directory information in a specific directory.
Table 1-18 Perform SFTP directory operation
|
Operation |
Command |
Description |
|
Enter system view |
system-view |
— |
|
Enter SFTP client view |
sftp { host-ip | host-name } |
— |
|
Change the current directory |
cd remote-path |
Optional |
|
Return to the upper directory |
cdup |
|
|
Display the current directory |
pwd |
|
|
Display the file list of a directory |
dir [ remote-path ] |
Optional The dir and ls commands have the same function. |
|
ls [ remote-path ] |
||
|
Create a directory on the SFTP server |
mkdir remote-path |
Optional |
|
Delete a directory from the SFTP server |
rmdir remote-path |
IV. Performing SFTP file operations
SFTP file operations include: renaming a file, downloading a file, uploading a file, displaying the file list, and deleting a file.
Table 1-19 Performing SFTP file operations
|
Operation |
Command |
Description |
|
Enter system view |
system-view |
Optional |
|
Enter SFTP client view |
sftp { host-ip | host-name } |
|
|
Rename a file on the remote SFTP server |
rename old-name new-name |
|
|
Download a file from the remote SFTP server |
get remote-file [ local-file ] |
|
|
Upload a file to the remote SFTP server |
put local-file [ remote-file ] |
|
|
Display the file list of a directory |
dir [ remote-path ] |
Optional The dir and ls commands have the same function. |
|
ls [ remote-path ] |
||
|
Delete a file from the SFTP server |
delete remote-file |
Optional The delete and remove commands have the same function. |
|
remove remote-file |
V. Displaying help information
You can use the command here to display help information (such as syntax and parameters) about an SFTP client command.
Table 1-20 Display help information about an SFTP client command
|
Operation |
Command |
Description |
|
Enter system view |
system-view |
— |
|
Enter SFTP client view |
sftp { host-ip | host-name } |
— |
|
Display help information about one or all SFTP client commands |
help [ command-name ] |
Optional |
VI. Specifying a source IP address or source interface for the SFTP client
You can use the command here to specify a source IP address or source interface for the SFTP client, thus enhancing traffic manageability.
Table 1-21 Specify a source IP address/interface for the SFTP client
|
Operation |
Command |
Description |
|
Enter system view |
system-view |
— |
|
Specify a source IP address for the SFTP client |
sftp source-ip ip-address |
Optional |
|
Specify a source interface for the SFTP client |
sftp source-interface interface-type interface-number |
Optional |
|
Display the current source IP address or the IP address of the source interface specified for the SFTP client |
display sftp source-ip |
Optional You can execute this command in any view. |
1.2.4 SFTP Configuration Example
I. Network requirements
As shown in Figure 1-14:
l Suppose SSH-related configuration has been performed on Switch A and Switch B.
l Suppose an SSH user named "abc" with password "hello" already exists.
l Switch B serves as an SFTP server, with IP address 10.111.27.91.
l Switch A serves as an SFTP client.
II. Network diagram
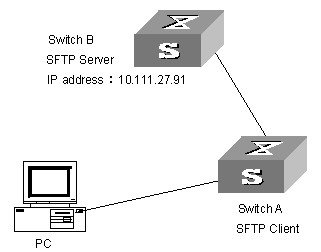
Figure 1-14 Network diagram for SFTP configuration
III. Configuration procedure
1) Configure Switch B (SFTP server)
# Enable SFTP Server.
[H3C] sftp server enable
# Specify SFTP service for SSH user abc.
[H3C] ssh user abc service-type sftp
2) Configure Switch A (SFTP client)
# Establish a connection to the remote SFTP server and enter SFTP client view.
[H3C] sftp 10.111.27.91
# Display the current directory on the SFTP server, delete file z and verify the operation.
sftp-client> dir
-rwxrwxrwx 1 noone nogroup 1759 Aug 23 06:52 config.cfg
-rwxrwxrwx 1 noone nogroup 225 Aug 24 08:01 pubkey2
-rwxrwxrwx 1 noone nogroup 283 Aug 24 07:39 pubkey1
drwxrwxrwx 1 noone nogroup 0 Sep 01 06:22 new
-rwxrwxrwx 1 noone nogroup 225 Sep 01 06:55 pub
-rwxrwxrwx 1 noone nogroup 0 Sep 01 08:00 z
sftp-client> delete z
The following File will be deleted:
flash:/z
Are you sure to delete it?(Y/N):y
This operation may take a long time.Please wait...
File successfully Removed
sftp-client> dir
-rwxrwxrwx 1 noone nogroup 1759 Aug 23 06:52 config.cfg
-rwxrwxrwx 1 noone nogroup 225 Aug 24 08:01 pubkey2
-rwxrwxrwx 1 noone nogroup 283 Aug 24 07:39 pubkey1
drwxrwxrwx 1 noone nogroup 0 Sep 01 06:22 new
-rwxrwxrwx 1 noone nogroup 225 Sep 01 06:55 pub
# Create directory new1 and verify the operation.
sftp-client> mkdir new1
New directory created
sftp-client> dir
-rwxrwxrwx 1 noone nogroup 1759 Aug 23 06:52 config.cfg
-rwxrwxrwx 1 noone nogroup 225 Aug 24 08:01 pubkey2
-rwxrwxrwx 1 noone nogroup 283 Aug 24 07:39 pubkey1
drwxrwxrwx 1 noone nogroup 0 Sep 01 06:22 new
-rwxrwxrwx 1 noone nogroup 225 Sep 01 06:55 pub
drwxrwxrwx 1 noone nogroup 0 Sep 02 06:30 new1
# Rename directory new1 to new2 and verify the operation.
sftp-client> rename new1 new2
File successfully renamed
sftp-client> dir
-rwxrwxrwx 1 noone nogroup 1759 Aug 23 06:52 config.cfg
-rwxrwxrwx 1 noone nogroup 225 Aug 24 08:01 pubkey2
-rwxrwxrwx 1 noone nogroup 283 Aug 24 07:39 pubkey1
drwxrwxrwx 1 noone nogroup 0 Sep 01 06:22 new
-rwxrwxrwx 1 noone nogroup 225 Sep 01 06:55 pub
drwxrwxrwx 1 noone nogroup 0 Sep 02 06:33 new2
# Download file pubkey2 and rename it to public.
sftp-client> get pubkey2 public
Remote file:flash:/pubkey2 ---> Local file: public..
Downloading file successfully ended
# Upload the file pu to the SFTP server and rename it to puk. Verify the operations.
sftp-client> put pu puk
Local file: pu ---> Remote file: flash:/puk
Uploading file successfully ended
sftp-client> dir
-rwxrwxrwx 1 noone nogroup 1759 Aug 23 06:52 config.cfg
-rwxrwxrwx 1 noone nogroup 225 Aug 24 08:01 pubkey2
-rwxrwxrwx 1 noone nogroup 283 Aug 24 07:39 pubkey1
drwxrwxrwx 1 noone nogroup 0 Sep 01 06:22 new
drwxrwxrwx 1 noone nogroup 0 Sep 02 06:33 new2
-rwxrwxrwx 1 noone nogroup 283 Sep 02 06:35 pub
-rwxrwxrwx 1 noone nogroup 283 Sep 02 06:36 puk
sftp-client>
# Stop SFTP Client.
sftp-client> quit
Bye
[H3C]
