- Table of Contents
-
- 03-Layer 2 - LAN Switching Configuration Examples
- 01-H3C_MAC_Address_Table_Configuration_Examples
- 02-H3C_Ethernet_Link_Aggregation_Configuration_Examples
- 03-H3C_Port_Isolation_Configuration_Examples
- 04-H3C_Spanning_Tree_Configuration_Examples
- 05-H3C_VLAN_Configuration_Examples
- 06-H3C_MVRP_Configuration_Examples
- 07-H3C_QinQ_Configuration_Examples
- 08-H3C_VLAN_Mapping_Configuration_Examples
- 09-H3C_DRNI_Configuration_Examples
- Related Documents
-
| Title | Size | Download |
|---|---|---|
| 07-H3C_QinQ_Configuration_Examples | 108.01 KB |
|
|
|
H3C QinQ Configuration Examples |
|
|
|
|
|
|
Software version: Release 7577P04
Document version: 6W100-20190330
Copyright © 2019 New H3C Technologies Co., Ltd. All rights reserved.
No part of this manual may be reproduced or transmitted in any form or by any means without prior written consent of New H3C Technologies Co., Ltd.
Except for the trademarks of New H3C Technologies Co., Ltd., any trademarks that may be mentioned in this document are the property of their respective owners.
The information in this document is subject to change without notice.
Introduction
This document provides examples for using QinQ to transmit 802.1Q-tagged customer traffic in the service provider network.
A QinQ-enabled port tags all incoming frames (tagged or untagged) with the PVID tag.
The devices in the service provider network learn MAC addresses of CVLANs into the MAC address table of the SVLAN.
Prerequisites
The configuration examples in this document were created and verified in a lab environment, and all the devices were started with the factory default configuration. When you are working on a live network, make sure you understand the potential impact of every command on your network.
This document assumes that you have basic knowledge of H3C QinQ, .
Example: Configuring QinQ
Network configuration
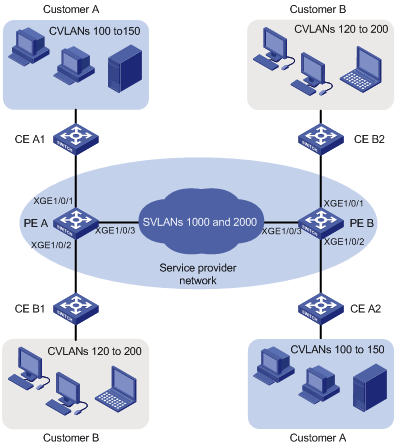
As shown in Figure 1:
· The service provider assigns VLAN 1000 to Company A's VLANs 100 through 150.
· The service provider assigns VLAN 2000 to Company B's VLANs 120 through 200.
Configure QinQ on PE A and PE B to transmit traffic in VLANs 1000 and 2000 for Company A and Company B, respectively.
Restrictions and guidelines
When you configure QinQ, follow these restrictions and guidelines:
· You only need to configure QinQ on customer-side ports of PEs.
· The link type of the customer-side port can be access, hybrid, or trunk.
¡ If the link type is access, you must assign the port to the SVLAN.
¡ If the link type is trunk, you must assign the port to the SVLAN, and set the SVLAN ID as the PVID of the port.
¡ If the link type is hybrid, you must assign the port to the SVLAN as an untagged VLAN member, and set the SVLAN ID as the PVID of the port. The settings ensure that the port can forward traffic to the customer site with the SVLAN tag removed.
¡ Set the MTU to a minimum of 1504 bytes for each port on the path of QinQ frames. This value is the sum of the default Ethernet interface MTU (1500 bytes) and the length (4 bytes) of a CVLAN tag. The CVLAN tag of QinQ frames is treated as part of the payload during transmission.
¡ Configure all the ports on the forwarding path to allow frames from VLANs 1000 and 2000 to pass through without removing the VLAN tag.
Procedures
Configuring PE A
1. Create VLANs 1000 and 2000.
<PE_A> system-view
[PE_A] vlan 1000
[PE_A-vlan1000] quit
[PE_A] vlan 2000
[PE_A-vlan2000] quit
2. Configure Ten-GigabitEthernet 1/0/1:
# Configure the port as an access port, and assign the port to VLAN 1000.
[PE_A] interface ten-gigabitethernet 1/0/1
[PE_A-Ten-GigabitEthernet1/0/1] port access vlan 1000
# Enable QinQ on the port.
[PE_A-Ten-GigabitEthernet1/0/1] qinq enable
# Bring up the port.
[PE_A-Ten-GigabitEthernet1/0/1] undo shutdown
[PE_A-Ten-GigabitEthernet1/0/1] quit
3. Configure Ten-GigabitEthernet 1/0/2:
# Configure the port as an access port, and assign the port to VLAN 2000.
[PE_A] interface ten-gigabitethernet 1/0/2
[PE_A-Ten-GigabitEthernet1/0/2] port access vlan 2000
# Enable QinQ on the port.
[PE_A-Ten-GigabitEthernet1/0/2] qinq enable
# Bring up the port.
[PE_A-Ten-GigabitEthernet1/0/2] undo shutdown
[PE_A-Ten-GigabitEthernet1/0/2] quit
4. Configure Ten-GigabitEthernet 1/0/3:
# Configure the port as a trunk port.
[PE_A] interface ten-gigabitethernet 1/0/3
[PE_A-Ten-GigabitEthernet1/0/3] port link-type trunk
# Assign the port to VLANs 1000 and 2000.
[PE_A-Ten-GigabitEthernet1/0/3] port trunk permit vlan 1000 2000
# Remove the port from VLAN 1.
[PE_A-Ten-GigabitEthernet1/0/3] undo port trunk permit vlan 1
# Bring up the port.
[PE_A-Ten-GigabitEthernet1/0/3] undo shutdown
[PE_A-Ten-GigabitEthernet1/0/3] quit
Configuring PE B
1. Create VLANs 1000 and 2000.
<PE_B> system-view
[PE_B] vlan 1000
[PE_B-vlan1000] quit
[PE_B] vlan 2000
[PE_B-vlan2000] quit
2. Configure Ten-GigabitEthernet 1/0/1:
# Configure the port as an access port, and assign the port to VLAN 2000.
[PE_B] interface ten-gigabitethernet 1/0/1
[PE_B-Ten-GigabitEthernet1/0/1] port access vlan 2000
# Enable QinQ on the port.
[PE_B-Ten-GigabitEthernet1/0/1] qinq enable
# Bring up the port.
[PE_B-Ten-GigabitEthernet1/0/1] undo shutdown
[PE_B-Ten-GigabitEthernet1/0/1] quit
3. Configure Ten-GigabitEthernet 1/0/2:
# Configure the port as an access port, and assign the port to VLAN 1000.
[PE_B] interface ten-gigabitethernet 1/0/2
[PE_B-Ten-GigabitEthernet1/0/2] port access vlan 1000
# Enable QinQ on the port.
[PE_B-Ten-GigabitEthernet1/0/2] qinq enable
# Bring up the port.
[PE_B-Ten-GigabitEthernet1/0/2] undo shutdown
[PE_B-Ten-GigabitEthernet1/0/2] quit
4. Configure Ten-GigabitEthernet 1/0/3:
# Configure the port as a trunk port.
[PE_B] interface ten-gigabitethernet 1/0/3
[PE_B-Ten-GigabitEthernet1/0/3] port link-type trunk
# Assign the port to VLANs 1000 and 2000.
[PE_B-Ten-GigabitEthernet1/0/3] port trunk permit vlan 1000 2000
# Remove the port from VLAN 1.
[PE_B-Ten-GigabitEthernet1/0/3] undo port trunk permit vlan 1
# Bring up the port.
[PE_B-Ten-GigabitEthernet1/0/3] undo shutdown
[PE_B-Ten-GigabitEthernet1/0/3] quit
Configuring devices between PE A and PE B
# Set the MTU to a minimum of 1504 bytes for each port on the path of QinQ frames. (Details not shown.)
# Configure all ports on the forwarding path to allow frames from VLANs 1000 and 2000 to pass through without removing the VLAN tag. (Details not shown.)
Verifying the configuration
# Verify that each company's PCs can ping each other in the same CVLAN across the service provider network. (Details not shown.)
# Verify that the two companies' PCs cannot communicate at Layer 2 even if their CVLAN IDs are the same. The ARP tables on one company's PCs do not contain entries for MAC addresses of the other company's PCs. (Details not shown.)
Configuration files
· PE A:
#
vlan 1000
#
vlan 2000
#
interface Ten-GigabitEthernet1/0/1
port link-mode bridge
port access vlan 1000
qinq enable
undo shutdown
#
interface Ten-GigabitEthernet1/0/2
port link-mode bridge
port access vlan 2000
qinq enable
undo shutdown
#
interface Ten-GigabitEthernet1/0/3
port link-mode bridge
port link-type trunk
undo port trunk permit vlan 1
port trunk permit vlan 1000 2000
undo shutdown
#
· PE B:
#
vlan 1000
#
vlan 2000
interface Ten-GigabitEthernet1/0/1
port link-mode bridge
port access vlan 2000
qinq enable
undo shutdown
#
interface Ten-GigabitEthernet1/0/2
port link-mode bridge
port access vlan 1000
qinq enable
undo shutdown
#
interface Ten-GigabitEthernet1/0/3
port link-mode bridge
port link-type trunk
undo port trunk permit vlan 1
port trunk permit vlan 1000 2000
undo shutdown
#
Related documentation
· H3C S7500E Switch Series Layer 2—LAN Switching Command Reference-R757X
· H3C S7500E Switch Series Layer 2—LAN Switching Configuration Guide-R757X
