- Released At: 17-01-2020
- Page Views:
- Downloads:
- Table of Contents
- Related Documents
-
H3C Fixed-Configuration Switches Quick Upgrade Guide at the CLI
Document version: 6W100-20191210
Copyright © 2019 New H3C Technologies Co., Ltd. All rights reserved.
No part of this manual may be reproduced or transmitted in any form or by any means without prior written consent of New H3C Technologies Co., Ltd.
Except for the trademarks of New H3C Technologies Co., Ltd., any trademarks that may be mentioned in this document are the property of their respective owners.
The information in this document is subject to change without notice.
Contents
Upgrade restrictions and guidelines
Logging in to the switch locally through the console port
Configuring the management IP address
Assigning an IP address to the PC
Logging in to the switch through Telnet
Identifying the running software version
Identifying the free storage space
Transferring the upgrade file from the PC to the FTP server
Specifying startup image files
Handling a software upgrade failure
Version rollback application scenario·
Troubleshooting a software upgrade failure
Introduction
Software upgrade enables you to upgrade switch software, add new features, and fix software bugs.
This quick guide walks you through the steps required to use the CLI to upgrade software, install features, and patch software on an H3C fixed-configuration switch. For more software upgrade methods, see the following documents:
· H3C Fixed-Configuration Switches Quick Upgrade Guide at the Web Interface (for switches supporting only the Web login method).
· Release notes for the switch.
· Software upgrade or ISSU in the fundamentals configuration guide for the switch.
Upgrade restrictions and guidelines
· Read the release notes for the upgrade software version to evaluate the upgrade impact on your network and verify the following items:
¡ Version and size of the upgrade software.
¡ Compatibility of the upgrade software with the current BootWare image and startup software image.
· When you install a patch, the patch version must match your switch model and Comware software version.
· The switch will be rebooted during the upgrade process. As a best practice, upgrade the switch during off-peak hours.
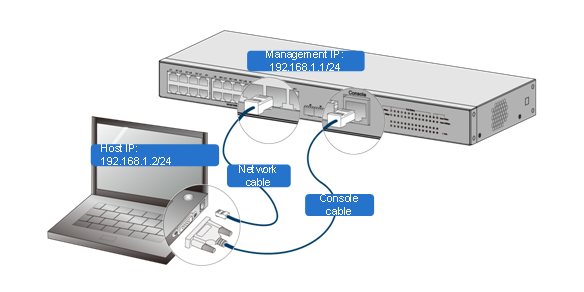
Networking scenarios
Figure 1 shows the common local upgrade scenario, where a PC is connected to the switch through a console cable and a network cable.
Figure 2 shows the common remote upgrade scenario, where you log in to the switch through Telnet remotely.
Figure 1 Upgrading software from a local PC

Figure 2 Upgrading software from a remote PC

Table 1 shows the configuration data and files used in the upgrade.
Table 1 Configuration data and files used in the upgrade
|
Configuration data or file |
IP address or file name |
Remarks |
|
Management IP address |
192.168.1.1 |
The management IP address is typically the IP address of the management interface or the IP address of the VLAN interface associated with the management VLAN. This example uses VLAN 99 as the management VLAN. |
|
Host IP address |
192.168.1.2 |
To upgrade software from a local PC, make sure this IP address belongs to the same subnet as the management IP address. To upgrade software from a remote PC, make sure this IP address and the management IP address must be able to reach each other. |
|
Running configuration file |
startup.cfg |
None. |
|
Running software image file |
r6126p20.ipe |
None. |
|
Upgrade software image file |
r6126p65.ipe |
None. |
|
Running patch image file |
patch.bin |
None. |
|
Upgrade patch image file |
patch_new.bin |
This file is required only if you need to install a patch. |
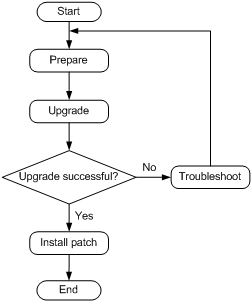
Upgrade process
Upgrade workflow
Figure 3 Upgrade workflow
Preparing for the upgrade
Obtaining the upgrade file
You can obtain the upgrade file by using the following methods:
· Log in to the H3C website at https://www.h3c.com/en and navigate to Support > Resource Center > Software Download > Switches. Then, find the target switch model and download its software image file.
· Contact H3C Support to obtain the upgrade file.
Figure 4 Navigating to the Software Download page

Logging in to the switch locally through the console port
1. As shown in Figure 5, use a console cable to connect the PC to the console port on the switch.
2. To upgrade switch software from the local PC, also use a network cable to connect the PC to an Ethernet port on the switch.
3. Run a terminal emulation program on the PC and configure the following parameters:
¡ Bits per second—9600.
¡ Data bits—8.
¡ Stop bits—1.
¡ Parity—None.
¡ Flow control—None. As a best practice to ensure connectivity with the switch, disable all flow control settings.
By default, you can log in to the switch through the console port without being authenticated.
Your user role is network-admin after you successfully log in.
Figure 5 Logging in to the switch locally through the console port
Configuring the management IP address
# Create VLAN 99 as the management VLAN.
<Sysname> system-view
[Sysname] vlan 99
[Sysname-vlan99] quit
# Create a VLAN interface for the VLAN.
[Sysname] interface vlan-interface 99
# Assign IP address 192.168.1.1/24 to VLAN-interface 99.
[Sysname-Vlan-interface99] ip address 192.168.1.1 24
[Sysname-Vlan-interface99] quit
# Enter the view of the Ethernet port connected to the PC.
[Sysname] interface gigabitethernet 1/0/1
# Configure the Ethernet port as an access port.
[Sysname-GigabitEthernet1/0/1] port link-type access
# Assign the Ethernet port to the VLAN.
[Sysname-GigabitEthernet1/0/1] port default vlan99
[Sysname-GigabitEthernet1/0/1] quit
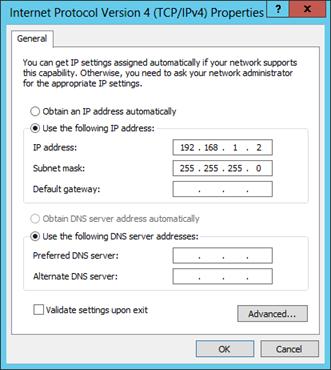
Assigning an IP address to the PC
# Assign IP address 192.168.1.2/24 to the PC.
Figure 6 Configuring the host IP address
# Press Win+R to open the Run window and enter cmd to open the Command Prompt window. Enter the ping command to test the network connectivity. Make sure the PC and the switch can reach each other.
C:\ Documents and Setting\Administrator> ping 192.168.1.1
Pinging 192.168.1.1 with 32 bytes of data:
Reply from 192.168.1.1: bytes=32 time=22ms TTL=253
Reply from 192.168.1.1: bytes=32 time=30ms TTL=253
Reply from 192.168.1.1: bytes=32 time=30ms TTL=253
Reply from 192.168.1.1: bytes=32 time=30ms TTL=253
Ping statistics for 192.168.1.1:
Packets: Sent = 4, Received = 4, Lost = 0 (0% loss),
Approximate round trip times in milli-seconds:
Minimum = 30ms, Maximum = 31ms, Average = 30ms
Logging in to the switch through Telnet
Configuring the Telnet service on the switch from the local PC
By default, the Telnet server is disabled on the switch. You must enable the Telnet server and make sure the remote PC and the switch can reach each other.
# Enable the Telnet server.
[Sysname] telnet server enable
# Set the authentication mode to password. By default, the default authentication mode for Telnet users is password.
[Sysname] line vty 0 63
[Sysname-line-vty0-63] authentication-mode password
# Set the password for password authentication.
[Sysname-line-vty0-63] set authentication password simple 123456
# Assign the network-admin user role to VTY users.
[Sysname-line-vty0-63] user-role network-admin
# Save the running configuration.
[Sysname] save
Telnetting to the switch from the remote PC
1. On the remote PC, press Win+R to open the Run window and enter cmd to open the Command Prompt window.
2. Enter the telnet command as follows:
C:\ Documents and Setting\Administrator> telnet 192.168.1.1
3. Enter the password to Telnet to the switch.
For more information, see login management in the fundamentals configuration guide.
Identifying the running software version
# Display the running software version on the switch.
<Sysname> display version
H3C Comware Software, Version 7.1.070, Release 6126P20
Copyright (c) 2004-2019 New H3C Technologies Co., Ltd. All rights reserved.
H3C S5130S-52S-HI uptime is 0 weeks, 2 days, 19 hours, 35 minutes
Last reboot reason : User reboot
…
Identifying the free storage space
# Verify that the switch has sufficient storage for the upgrade file.
<Sysname> dir
Directory of flash:
0 drw- 707584 Jan 29 2013 05:41:21 123.bin
1 drw- 12639 Jan 29 2013 05:41:21 patch.bin
2 drw- 48866304 Jan 02 2013 08:30:11 r6126p20.ipe
3 -rw- 591 Jan 01 2013 03:31:14 serverkey
4 -rw- 6304 Feb 02 2013 06:58:55 startup.cfg
5 -rw- 159335 Feb 02 2013 06:58:55 startup.mdb
6 -rw- 0 Jan 02 2013 06:19:27 topology.dba
7 drw- - Jan 02 2013 05:32:24 versionInfo
…
251904 KB total (25052 KB free)
# If the free storage space is not sufficient on the switch, use the delete/unreserved command to delete unused files.
<Sysname> delete /unreserved 123.bin
The file cannot be restored. Delete flash:/123.bin? [Y/N]:y
Deleting the file permanently will take a long time. Please wait...
Deleting file flash:/123.bin...Done.
|
|
NOTE: · An .ipe file is decompressed as multiple .bin files during the upgrade process. Make sure the free storage space is two times the size of the upgrade file. · The delete/unreserved command deletes a file permanently, and the action cannot be undone. To ensure data security, back up files to a file server before deleting them. |
Building an FTP environment
You can back up files and upload upgrade files through FTP, TFTP, or SFTP. This example uses the switch as an FTP server.
To build an FTP environment:
1. Save the running configuration.
[Sysname] save
The current configuration will be written to the device. Are you sure? [Y/N]:Y
Please input the file name(*.cfg)[flash:/startup.cfg]
(To leave the existing filename unchanged, press the enter key):
flash:/startup.cfg exists, overwrite? [Y/N]:Y
Validating file. Please wait...
Saved the current configuration to mainboard device successfully.
2. Configure the FTP server on the switch:
# Create a local FTP user account. Set the account name to abc, set the password to pwd, and specify the service type as FTP.
[Sysname] local-user abc
[Sysname-luser-manage-abc] password simple 123456
[Sysname-luser-manage-abc] service-type ftp
# Assign the network-admin user role to the user account so the FTP user can upload files to the server.
[Sysname-luser-manage-abc] authorization-attribute user-role network-admin
[Sysname-luser-manage-abc] quit
# Enable the FTP server on the switch.
[Sysname] ftp server enable
Backing up important files
1. Open the Command Prompt window, and log in to the FTP server.
# Log in to the FTP server.
C:\Documents and Setting\Administrator> ftp 192.168.1.1
Connected to 192.168.1.1.
220 FTP service ready.
# Enter the correct username and password.
User (192.168.1.1:(none)): abc
331 Password required for abc.
Password:
230 User logged in.
2. Backing up important files to the PC through FTP.
# Set the file transfer mode to binary.
ftp> binary
200 TYPE is now 8-bit binary
# Change the local working directory. In this example, the directory is D:\FTP.
ftp> lcd D:\FTP
# Back up the running configuration file.
ftp> get startup.cfg
# Back up the running software image file.
ftp> get r6126p20.ipe
|
|
NOTE: Backing up files through FTP takes a long time. As a best practice, download the image file for the current version from the H3C website as the backup image file. |
Upgrading the switch
Transferring the upgrade file from the PC to the FTP server
1. Put the upgrade file in the root directory of the PC.
2. Set the file transfer mode to binary.
ftp> binary
200 TYPE is now 8-bit binary
3. Upload the upgrade file from the PC to the default storage medium on the FTP server.
ftp> put r6126p65.ipe
4. Verify that the size of the upgrade file on the switch is the same as the size of the local upgrade file. If not, you must delete the upgrade file on the switch and upload the upgrade file again.
<Sysname> dir
Directory of flash:
0 drw- 12639 Jan 29 2013 05:41:21 patch.bin
1 drw- 48866304 Jan 02 2013 08:30:11 r6126p20.ipe
2 drw- 50810880 Jan 02 2013 08:30:11 r6126p65.ipe
3 -rw- 591 Jan 01 2013 03:31:14 serverkey
4 -rw- 6304 Feb 02 2013 06:58:55 startup.cfg
5 -rw- 159335 Feb 02 2013 06:58:55 startup.mdb
6 -rw- 0 Jan 02 2013 06:19:27 topology.dba
7 drw- - Jan 02 2013 05:32:24 versionInfo
…
251904 KB total (12018 KB free)
Specifying startup image files
1. Specify the r6126p65.ipe file as the main startup image file.
<Sysname> boot-loader file flash:/r6126p65.ipe all main
2. Specify r6126p20.ipe as the backup startup image file. Select whether to delete the r6126p65.ipe file after it is decompressed. As a best practice, select N.
<Sysname> boot-loader file flash:/r6126p20.ipe all backup
Do you want to delete flash:/r6126p65.ipe now? [Y/N]:N
3. Verify that the startup image file settings are correct.
<Sysname> display boot-loader
Software images on slot 1:
Current software images:
flash:/cmw710-boot-r6126p20.bin
flash:/cmw710-system-r6126p20.bin
Main startup software images:
flash:/cmw710-boot-r6126p65.bin
flash:/cmw710-system-r6126p65.bin
Backup startup software images:
flash:/cmw710-boot-r6126p20.bin
flash:/cmw710-system-r6126p20.bin
|
|
NOTE: In an IRF fabric, you must specify the startup image files for both the master and subordinate devices. For more information, see the release notes or software upgrade in the fundamentals configuration guide. |
Rebooting the switch
# Reboot the switch to load the new software image.
<Sysname> reboot
Start to check configuration with next startup configuration file, please wait..
.......DONE!
Current configuration may be lost after the reboot, save current configuration?
[Y/N]:N
This command will reboot the device. Continue? [Y/N]:Y
Now rebooting, please wait.......
|
|
NOTE: Enabling the FTP server increases the possibility of being attacked. As a best practice, do not save the configuration after rebooting the switch. |
Verifying the upgrade
1. Verify that the switch is running the correct software version.
<Sysname> display version
H3C Comware Software, Version 7.1.070, Release 6126P65
Copyright (c) 2004-2019 New H3C Technologies Co., Ltd. All rights reserved.
H3C S5130S-52S-HI uptime is 0 weeks, 2 days, 19 hours, 35 minutes
Last reboot reason : User reboot
…
2. Verify that the startup image file settings are correct.
<Sysname> display boot-loader
Software images on slot 1:
Current software images:
flash:/cmw710-boot-r6126p65.bin
flash:/cmw710-system-r6126p65.bin
Main startup software images:
flash:/cmw710-boot-r6126p65.bin
flash:/cmw710-system-r6126p65.bin
Backup startup software images:
flash:/cmw710-boot-r6126p20.bin
flash:/cmw710-system-r6126p20.bin
3. Verify that the switch can operate correctly after the upgrade.
# Display the switch state.
<Sysname> display device
Slot Type State Subslot Soft Ver Patch Ver
1 S5130S-52S-HI Master 0 S5130S-52S-HI6126P65 None
<Sysname> display system stable state
System state : Stable
Redundancy state : No redundance
Slot CPU Role State
1 0 Active Stable
The switch is stable if the System State field displays Stable.
|
|
NOTE: Alternatively, you can identify whether the switch is operating correctly by examining the following items: · The differences between the running configuration and the next-startup configuration (displayed by using the display diff current-configuration startup-configuration command). · The routing table and FIB table information. · Whether an added feature has taken effect. |
(Optional) Installing a patch
1. Verify that the switch has sufficient storage space for the patch file by using the dir command.
2. Back up the current patch file to the PC, and upload the new patch file from the PC to the default storage medium of the switch.
ftp> get patch.bin
ftp> put patch_new.bin
3. Identify the patching status and patch running status. If a patch was installed, uninstall it before installing the new patch.
4. (Optional.) Uninstall the existing patch.
<H3C> install deactivate patch flash:/patch.bin slot 1
This operation maybe take several minutes, please wait...............Done.
<H3C> install commit
After you execute the install commit command, the uninstalled patch does not run after a switch reboot. If you do not execute the install commit command, the uninstalled patch runs after a switch reboot.
5. Install the patch.
<Sysname> install activate patch flash:/patch_new.bin slot 1
This operation maybe take several minutes, please wait..............Done.
<Sysname> install commit
After you execute the install commit command, the installed patch runs after a switch reboot. If you do not execute the install commit command, the installed patch does not run after a switch reboot.
6. Verify that the patch has been installed successfully
<Sysname> display install active
Active packages on slot 1:
flash:/patch_new.bin
The output shows that the patch has been installed successfully.
|
|
NOTE: If the switch software is upgraded and then downgraded to the original version, the installed patch will become invalid. You must install the patch again. |
Handling a software upgrade failure
Version rollback
Version rollback application scenario
In addition to a software upgrade failure, a business requirement change might also require a version rollback.
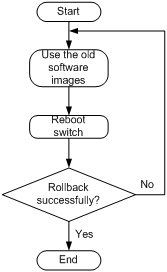
Version rollback workflow
Figure 7 Version rollback workflow
Version rollback procedure
1. Specify r6126p20.ipe as the main startup image file.
<Sysname> boot-loader file flash:/r6126p20.ipe all main
2. Verify that the main startup image file setting is correct.
<Sysname> display boot-loader
Software images on slot 1:
Current software images:
flash:/cmw710-boot-r6126p65.bin
flash:/cmw710-system-r6126p65.bin
Main startup software images:
flash:/cmw710-boot-r6126p20.bin
flash:/cmw710-system-r6126p20.bin
Backup startup software images:
flash:/cmw710-boot-r6126p20.bin
flash:/cmw710-system-r6126p20.bin
3. Reboot the switch.
<Sysname> reboot
Start to check configuration with next startup configuration file, please wait..
.......DONE!
Current configuration may be lost after the reboot, save current configuration?
[Y/N] :Y
4. Verify that the switch is running the correct software version.
<Sysname> display version
H3C Comware Software, Version 7.1.070, Release 6126P20
Copyright (c) 2004-2019 New H3C Technologies Co., Ltd. All rights reserved.
H3C S5130S-52S-HI uptime is 0 weeks, 2 days, 19 hours, 35 minutes
Last reboot reason : User reboot
…
Troubleshooting a software upgrade failure
If a software upgrade fails, the system runs the backup startup image file. To troubleshoot a software upgrade failure:
1. Verify that the physical ports are correctly and firmly connected,
2. If you are using the console port for file transfer, verify that the HyperTerminal settings are thes same as those settings on the switch.
3. Verify that the following file transfer settings are correct:
¡ Server IP address.
¡ File name.
¡ Working directory.
¡ FTP username and password.
4. Verify that the switch has enough storage space for the upgrade file.
