部署裸金属计算节点
裸金属计算节点支持部署在物理机或者虚拟机。
|
|
系统仅支持部署运行一个裸金属独立计算节点。 |
安装过程包括:安装准备、安装系统计算节点、配置计算节点数据库权限、手动配置计算节点。
安装准备
在Web浏览器上登录CAS云计算管理平台,创建虚拟机作为裸金属计算节点,负责提供裸金属计算能力。
|
|
· 关于CAS相关详细配置,可以参考CAS相关文档 · 虚拟机规格参数可参照H3C-CloudOS-PLAT运行环境要求,详见《H3C CloudOS 5.0 云操作系统部署指导》运行环境章节。 |
安装系统计算节点
|
|
· 主节点为登录GoMatrix用的节点,关于主节点及部署过程的详细介绍请参见《H3C CloudOS 5.0 云操作系统部署指导》。 · 务必先进行步骤c,再进行步骤d,否则NTP无法配置成功。 |
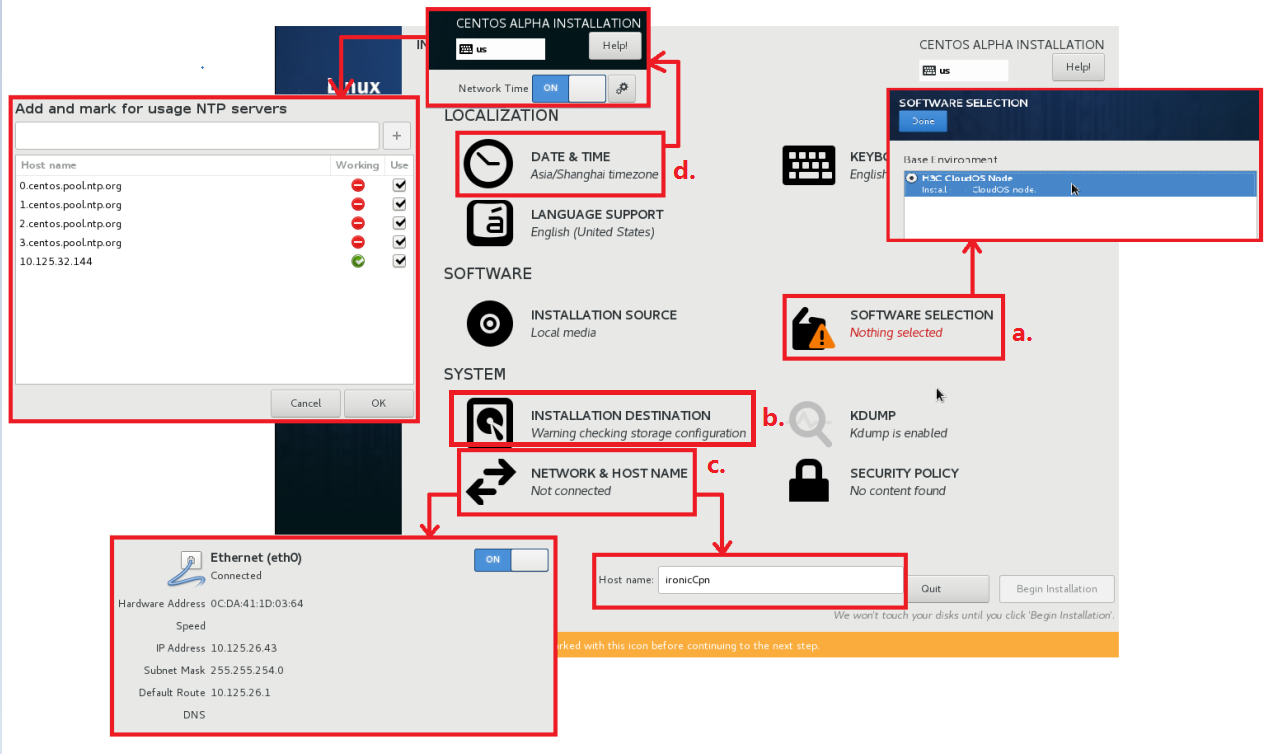
创建虚拟机后,加载本系统PLAT镜像安装系统计算节点:
选择软件包类型为“CloudOS Node”。
图-1 部署裸金属计算节点
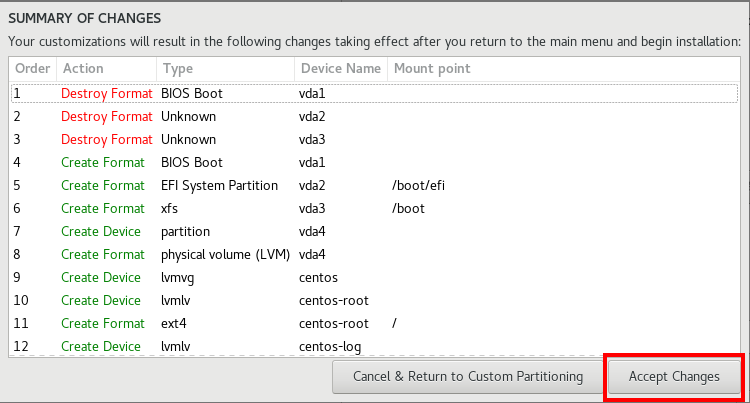
推荐进行手动分区。安装裸金属计算节点操作系统时建议手工分区,不要采用默认分区。手动分区时删除docker和mysql相关的分区,把多出的空间分给"/"分区。具体操作见下图。
图-2 手动分区设置
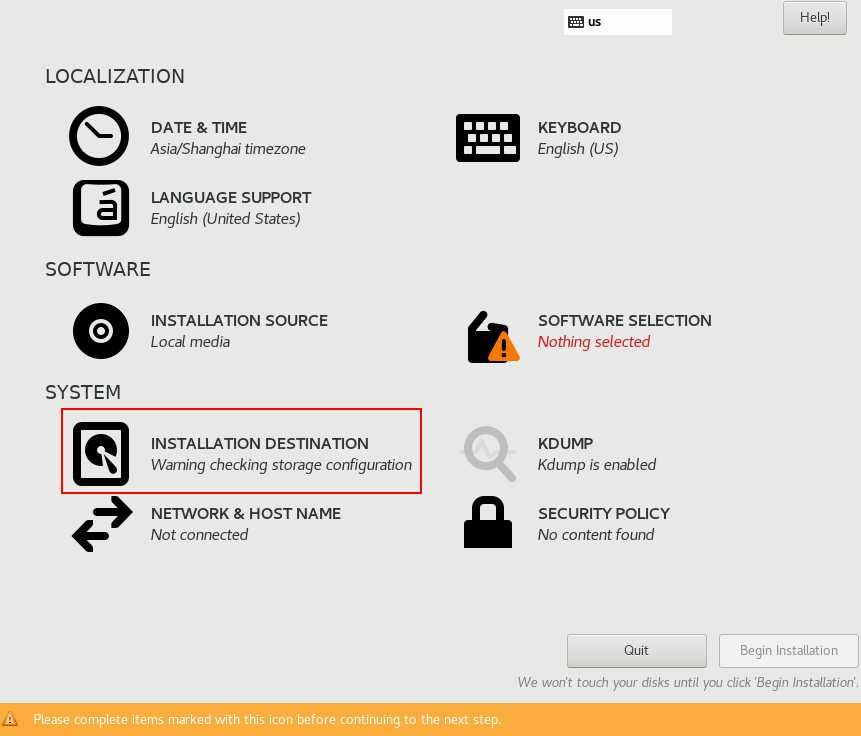
图-3 手动分区设置
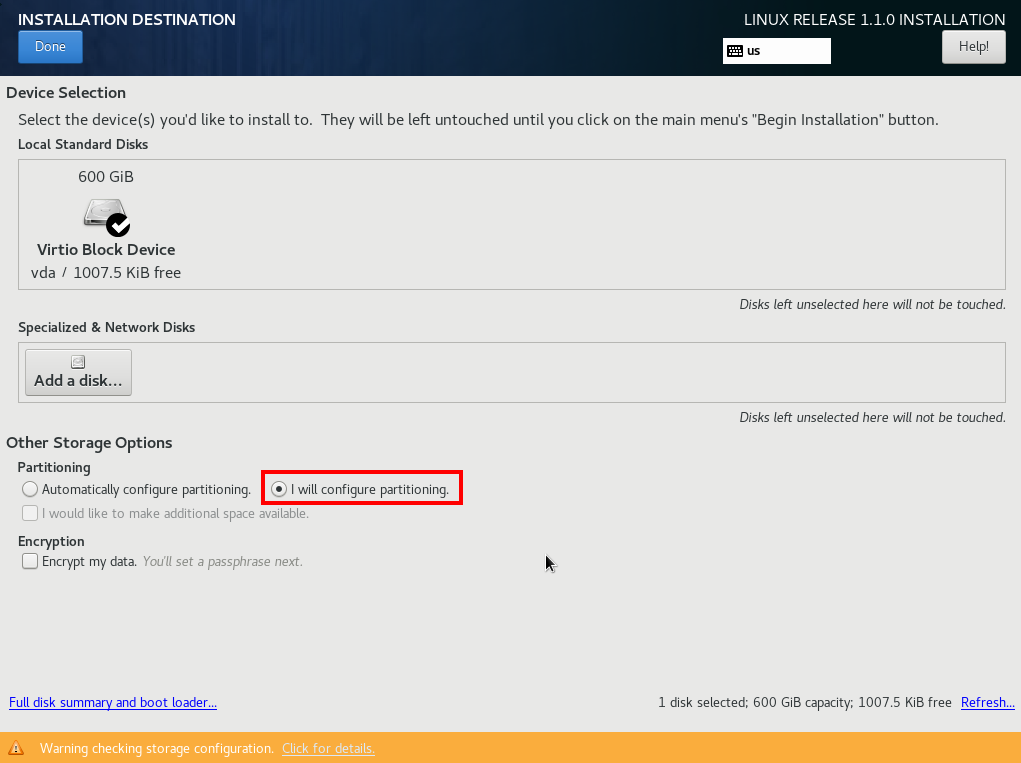
图-4 删除docker和mysql相关分区
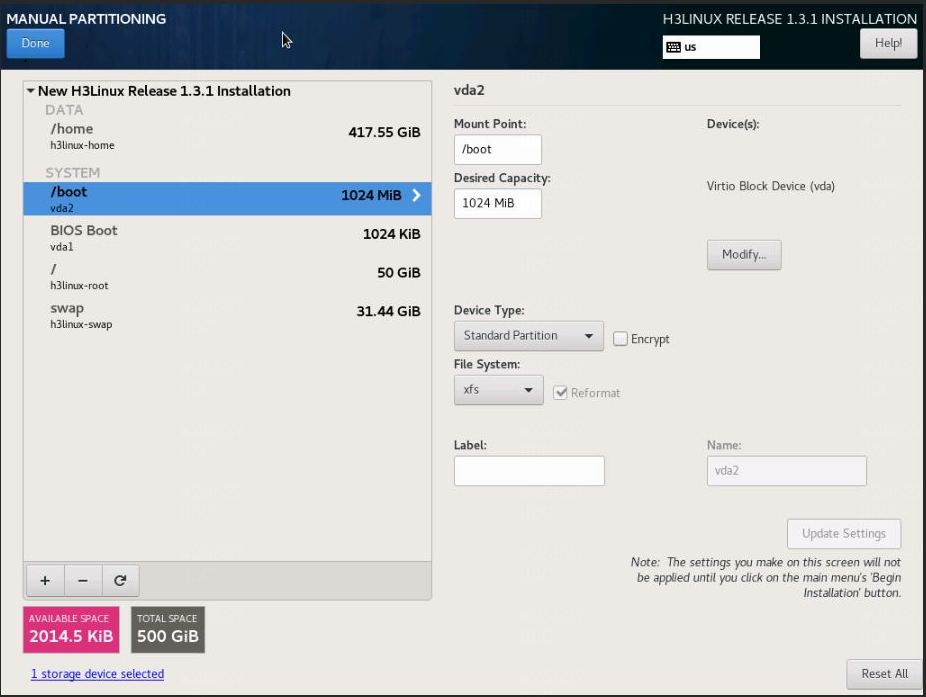
图-5 多出的空间分给"/"分区
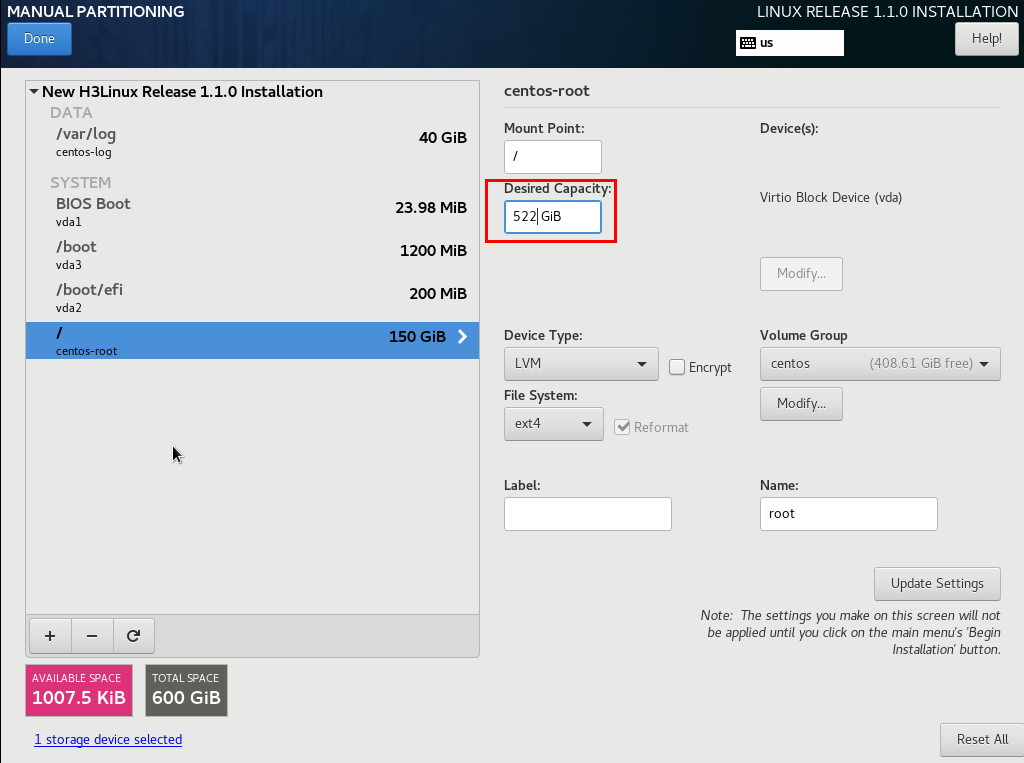
图-6 手动分区设置
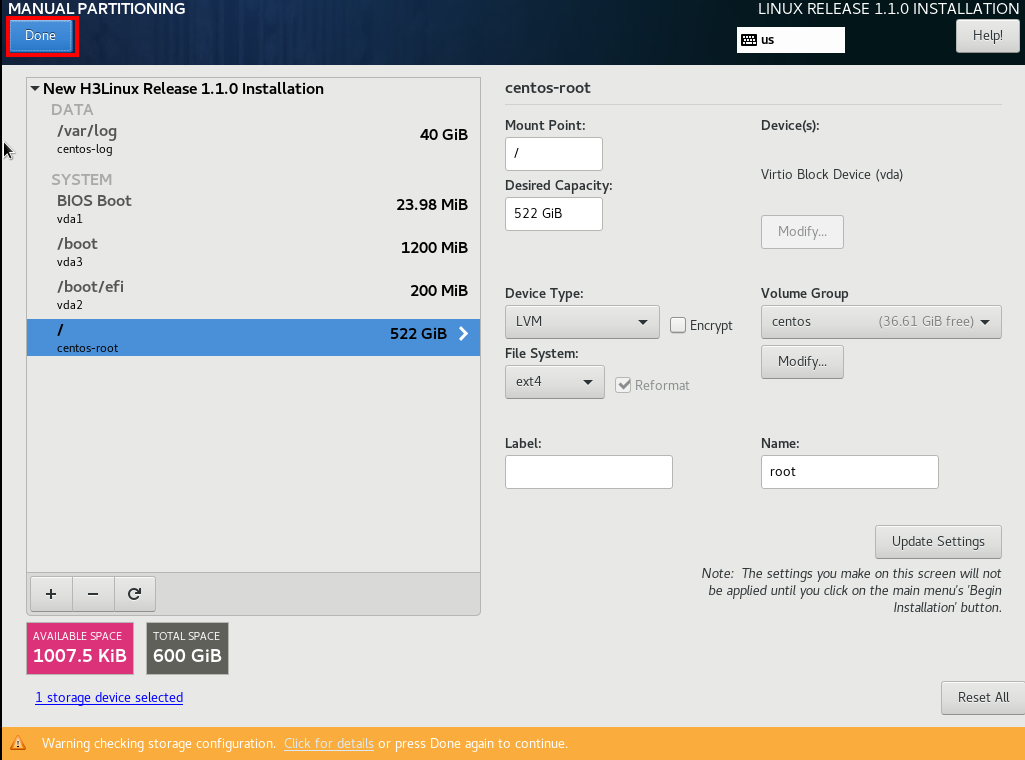
图-7 手动分区完成
配置计算节点主机名、IP地址。
配置计算节点NTP服务指向系统主节点。
配置计算节点数据库权限
此步骤用于给裸金属计算节点赋予访问、修改系统数据库的权限。
登录系统平台,在顶部导航栏中单击[系统]菜单项,进入系统首页。
在左侧导航树中单击[系统配置/安全设置/数据库白名单]菜单项,进入数据库白名单管理页面。
单击<添加>按钮,弹出添加数据库白名单窗口。
选择“IP”添加方式,输入裸金属计算节点IP,即安装系统计算节点步骤中指定的IP地址。
单击<确定>按钮完成操作。
手动配置计算节点
|
|
· 填写的所有标点符号都必须是半角英文符号。 · 裸金属计算节点版本须与控制节点版本保持一致。 · 已执行的脚本内容会被下发到相关配置文件中,若要修改不易实现,且重新执行脚本可能会引发问题,因此如需修改脚本内容建议重新安装。裸金属独立计算节点如果是安装在CAS上的虚拟机,可以在安装脚本前为其创建快照。安装脚本出错时,在CAS上恢复快照后重新安装脚本即可。 · Flat模式下裸金属场景网络VxLAN范围支持1-4094。建议裸金属方案在非层次化场景使用。 |
安装完成后使用SSH工具登录系统控制节点。
进入/opt/openstack路径,将openstack-compute-standalone.tar.gz文件传输到计算节点/root目录下,使用以下命令:
[root@node-0cbcd0 ~]# cd /opt/openstack
[root@node-0cbcd0 openstack]# ls
manila-share openstack-compute openstack-compute-standalone.tar.gz
[root@node-0cbcd0 openstack]# scp openstack-compute-standalone.tar.gz root@172.25.50.150:/root [注:172.25.50.150为裸金属计算节点ip]
使用SSH工具登录裸金属计算节点。
进入/root路径,并找到openstack-compute-standalone.tar.gz压缩包,使用以下命令:
[root@ironic-c ~]# pwd
/root
[root@ironic-c ~]# ls
openstack-compute-standalone.tar.gz
解压openstack-compute-standalone.tar.gz,使用以下命令:
[root@ironic-c ~]# tar -zxvf openstack-compute-standalone.tar.gz
进入解压目录,并将平台iso安装包上传到该目录下。
[root@ironic-c ~]# cd openstack-compute-standalone
在解压路径下,找到安装脚本install-compute-pike.sh,使用以下命令:
[root@ironic-c openstack-compute-standalone]# ls
xxx.iso compute images install-compute-pike.sh others packages readme.txt tools upgrade upgrade-ironic-mitaka2pike.sh yum.repos.d
注:请确保该目录下只有一个iso文件,且为上传的平台iso安装包
(可选)使用配置文件ironic-config.json对裸金属计算节点进行设置:当设置的内容检验通过时,无需再进入步骤10;检验不通过,则进入步骤10。
json文件内容如下:
{
"VMTTYPE":"5",//Please enter the number of hypervisor type (0 qemu, 1 VMWare, 2 cas, 3 KVM, 4 novadocker, 5 ironic) 仅支持虚拟化为5的
"MANAGE_IP":"",//Please enter Manage Network IP address of the compute node 裸金属计算节点管理网ip
"INSPECTION_IP":"",//Please enter Inspection Network IP address of the compute node 裸金属计算节点发现网ip
"PROVISION_IP":"",//Please enter Provision Network IP address of the compute node 裸金属计算节点部署网ip
"TEN_NETWORK_MODE":"",//Please enter the Mode of Network(1 flat , 2 multitenant) 仅支持输入‘1’与‘2’,‘1’表示flat,‘2’表示multitenant
"CONDUCTOR_GROUP":"", //Please enter the conductor_group of the compute node (eg: conductor_group001) 输入ironic-conductor名称
"OS_CONTROLLER_IP":"",//Please enter the Manage Network IP address of the controller node (or vitrual IP if it's cluster) 平台集群控制节点的ip
"OS_CONTROLLER_IP_OUTER_NET":"",//Please enter the Public Network IP address of the controller node (or vitrual IP if it's cluster) 平台集群控制节点的外部ip
"IS_CLUSTER":"",//Is the controller node a cluster environment?(1 yes, 2 no) 仅支持输入‘1’与‘2’,‘1’表示yes,‘2’表示no
"MATRIX_IP":"",//Please enter the IP address of the Matrix, for the configuration of chronyd server 时间同步chrony服务的ip地址
"STORAGE_TYPE":"",//Please enter the cinder storage type (0 None, 1 onestor, 2 lvm) 裸金属仅支持输入0,1,2,‘0’表示 None, ‘1’表示onestor类型, '2'表示lvm类型
"CINDER_AZ":"",//Please enter the cinder storage availability zone (eg: cinder_az) 裸金属存储可用域名称,可参考示例填写
"VOL_TYPE_OF_ONESTOR":"",//Please enter the volume type of onestor driver (0 iscsi) 选择存储卷类型
"IP_OF_ONESTOR_HANDY":"",//Please enter the IP of onestor handy (eg: 10.114.103.74) 输入onestor handy管理IP, 与独立计算节点互通
"USERNAME_OF_ONESTOR":"",//Please enter the user name of onestor server (eg: admin) 输入对应handy的用户名, 该用户可在CloudOS正常操作onestor功能
"PASSWORD_OF_ONESTOR":"",//Please enter the password of onestor server (eg: password) 输入对应handy的密码
"NODEPOOL_NAME_OF_ONESTOR":"",//Please enter the node pool name of onestor server (eg: p0) iscsi块存储节点池
"DISKPOOL_NAME_OF_ONESTOR":"",//Please enter the disk pool name of onestor server (eg: diskpool1) iscsi块存储硬盘池
"DATAPOOL_NAME_OF_ONESTOR":"",//Please enter the data pool name of onestor server (eg: datapool1) iscsi块存储名称
"IP_OF_ONESTOR_BLOCK_SERVICE":"",//Please enter the IP of onestor block service (eg: 10.114.103.76) iscsi块存储管理IP, 与独立计算节点互通
"DHCP_RANGE":"",//Please enter the dhcp range dhcp的地址池
"DHCP_NETMASK":"",//Please enter the dhcp netmask (eg: 255.255.255.0) dhcp服务的子网掩码
"BRIDGE_MAPPINGS":""//Please enter the multi-export config bridge_mappings according to the usage(eg: physnet2:vswitch2,physnet3:vswitch3) 设置网络出口名
}
执行安装脚本install-compute-pike.sh,使用以下命令:(如果ls: cannot access *.iso: No such file or directory
CAN NOT find the PLAT ISO file. Please upload this file to the directory where the install-compute-pike.sh file is located. exit!,则是palt iso不在该目录下,需要把文件传过来)
[root@ironiccpn openstack-compute-standalone]# sh install-compute-pike.sh.
执行脚本后根据提示填写相应配置内容,效果如下所示。
Please enter the number of hypervisor type (0 qemu, 1 VMWare, 2 cas, 3 KVM, 4 novadocker, 5 ironic): 5
Your choice of VMTTYPE is : [ 5 ] continue...
Please enter Manage Network IP address of the compute node(172.25.50.150): 172.25.50.150
Input IP address is: 172.25.50.150 Verifying Connection....
IP connection is OK
Please enter Inspection Network IP address of the compute node(172.25.50.150): 172.25.50.150
Input IP address is: 172.25.50.150 Verifying Connection....
IP connection is OK
Please enter Provision Network IP address of the compute node(172.25.50.150): 172.25.50.150
Input IP address is: 172.25.50.150 Verifying Connection....
IP connection is OK
Please enter the Mode of Network(1 flat , 2 mutitenant):1
Please enter the conductor_group of the compute node(eg: conductor_group001): conductor_group001
Please enter the Manage Network IP address of the controller node (or vitrual IP if it's cluster): 172.25.17.53(主节点ip[vip])
Input IP address is: 172.25.17.53 Verifying Connection....
IP connection is OK
Please enter the Public Network IP address of the controller node (or vitrual IP if it's cluster): 172.25.17.53(主节点ip[vip])
Input IP address is: 172.25.17.53 Verifying Connection....
IP connection is OK
Is the controller node a cluster environment?(1 yes, 2 no): 1
You have already confirmed the controller node you will connect is a Cluster mode! continue....
Please enter the IP address of the Matrix, for the configuration of ntpd server: 172.25.17.50(如果是单机,则填vip)
Input IP address is: 172.25.17.50 Verifying Connection....
IP connection is OK
Please enter the cinder storage type (0 None, 1 onestor, 2 lvm): 1
Please enter the cinder storage availability zone (eg: cinder_az): cinder_az
Please enter the volume type of onestor driver (0 iscsi): 0
Please enter the IP of onestor handy (eg: 10.114.103.74): 10.114.103.74
Please enter the user name of onestor server (eg: admin): admin
Please enter the password of onestor server (eg: password): password
Please enter the node pool name of onestor server (eg: p0): p0
Please enter the disk pool name of onestor server (eg: diskpool1): diskpool1
Please enter the data pool name of onestor server (eg: datapool1): datapool1
Please enter the IP of onestor block service (eg: 10.114.103.76): 10.114.103.76
Please enter the dhcp range (eg: 172.25.50.100,172.25.50.200): 172.25.50.151,172.25.50.160
Please enter the dhcp netmask (eg: 255.255.255.0): 255.255.240.0
Please enter the multi-export config bridge_mappings according to the usage(eg: physnet2:vswitch2,physnet3:vswitch3): vxlan:ironic
|
|
注意: Ctl+ w 回退 |
脚本中的部分项目可参考脚本中的示例进行填写,具体填写说明如下:
number of hypervisor type:参考示例填写Hypervisor类型,在本例中填写5,选择Ironic类型。
Manage Network IP address of the compute node:本计算节点的管理IP,与本平台通信。
Inspection Network IP address of the compute node:本计算节点的发现网络IP,用于裸金属节点发现过程。
Provision Network IP address of the compute node:本计算节点的部署网络IP,用于裸金属节点部署过程。
Mode of Network(1 flat , 2 mutitenant):1为常用的flat网络,2为多租户组网
Conductor_group of the compute node(eg: conductor_group001):conductor分组,一个分组管理一个conductor服务
Manage Network IP address of the controller node:管理节点的管理IP,根据实际情况填写。
Public Network IP address of the controller node:管理节点的公共IP,根据实际情况填写。
cluster environment:集群环境。若本平台部署模式为单机环境,则选择2。
IP address of the Matrix:Matrix节点IP地址。
cinder storage type:选择裸金属存储可用域的存储类型,本示例为onestor iscsi存储。
cinder storage availability zone:裸金属存储可用域名称,可参考示例填写。
volume type of onestor driver:选择存储卷类型。
the IP of onestor handy:输入onestor handy管理IP, 与独立计算节点互通。
user name/password of onestor server:输入对应handy的用户名/密码, 该用户可在CloudOS正常操作onestor功能。
the node pool name of onestor server:iscsi块存储节点池。
the disk pool name of onestor server:iscsi块存储硬盘池。
the data pool name of onestor server:iscsi块存储名称。
the IP of onestor block service:iscsi块存储管理IP, 与独立计算节点互通。
dhcp range:配置dhcp Server分配的IP地址范围,要求与本平台和裸金属计算节点网络互通。该dhcp Server分配的IP地址用于裸金属节点发现和部署阶段RAMdisk与Ironic-conductor之间的通信,部署完成后IP地址会被回收。
dhcp mask:配置dhcp Server分配的IP地址掩码。
multi-export config bridge_mappings according to the usage:配置计算节点的网络出口,填写格式为出口名称:出口设备。若需要配置多出口,填写格式为出口名称:出口设备,出口名称:出口设备。可参照示例填写。
填写完毕后自动执行,出现如下提示代表执行成功。
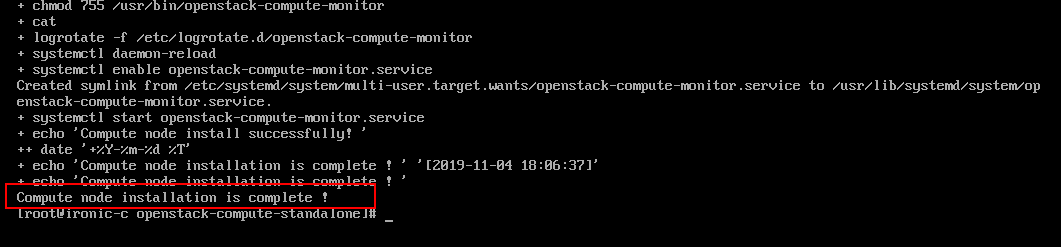
执行完脚本,请到平台侧重启os-ironic容器

若需要对接onestor iscsi存储,执行完脚本后,请参见【产品开局指导书】进行相关配置。
若环境为多租户组网,且裸金属服务器为UEFI启动,需要修改裸金属计算节点的配置文件/tftpboot/EFI/centos/grub-find.cfg。修改如下,在linuxefi开头的那一行最后添加下图红线部分。

|
|
如需进行裸金属服务器PXE网口与裸金属计算节点网卡跨网段配置,请在此步骤之后参考裸金属服务器PXE网口与裸金属计算节点网卡跨网段配置。 |
注意事项
从非多az环境升级到多az环境, 请在原计算节点升级或者重新部署原计算节点后, 到该计算节点/openstack-compute-standalone/upgrade目录下执行:
对于升级原计算节点的场景(执行的compute-setup.sh):
sh upgrade_conductor_group.sh [conductor_group](非必填参数, conductor_group值, 如果不填, 默认值为: default_conductor_group)
![]()
1.2 对于重新部署原计算节点的场景(执行的install-compute-pike.sh)
sh upgrade_conductor_group.sh [conductor_group](请保持和执行install-compute-pike.sh脚本时conductor_group输入值相同, 如: conductor_group1)
![]()
a和b的传参[conductor_group]是更新计算节点conductor_group的配置参数和更新该计算节点管理的裸金属节点conductor_group的数据参数,请参照括号内的提示进行设置。
a或b执行完成后, 请在三分钟内重启ironic 的pod(参见3) , 否则可能导致裸金属实例状态异常(恢复方法参见裸金属计算节点常见问题)。
对已有计算节点的环境增加一个裸金属计算节点时,先将已有的裸金属计算节点进行升级后,再安装新的裸金属计算节点。
在部署/升级完计算节点后,重启本平台环境上的ironic的pod。
kubectl delete pod -n cloudos-iaas os-ironic-5bfbcb7d9f-c977z

一个conductor_group只对应一个计算节点;多个裸金属计算节点必须使用相同的网络模式,不能混用flat和多租户。