- Released At: 10-10-2023
- Page Views:
- Downloads:
- Table of Contents
- Related Documents
-
LSXM1X86SUPE1 cloud supervisor engine unit
1 Identifier
The card identifier LSXM1X86SUPE1 is at the upper right corner of the front panel.
2 Introduction
The LSXM1X86SUPE1 cloud SEU contains the switching control unit and X86 server unit. The switching control unit is the core of control and switching for the device. The X86 server unit is designed for applications such as virtualization and database to meet IDC and cloud computing requirements.
3 Specifications
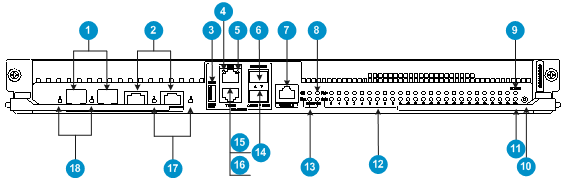
Figure 1 Front panel
|
(1) GE SFP management port for the switching control unit |
|
|
(2) 10/100/1000BASE-T management port for the switching control unit |
|
|
(3) USB port for the X86 server unit |
|
|
(4) LED for the 10/100/1000BASE-T port of the X86 server unit |
|
|
(5) LED for the BMC port of the X86 server unit |
(6) 10GE SFP+ port for the X86 server unit |
|
(7) Console port for the switching control unit |
(8) Power status LED (PWR) |
|
(9) Active/standby LED (ACTIVE) |
(10) Reset button (RESET) |
|
(11) Hard disk LED (HD) |
(12) Card status LED (SLOT) |
|
(13) Fan status LED (FAN) |
(14) LED for the 10GE SFP+ port of the X86 server unit |
|
(15) BMC port for the X86 server unit |
(16) 10/100/1000BASE-T port for the X86 server unit |
|
(17) LED for the 10/100/1000BASE-T management port of the switching control unit |
|
|
(18) LED for the GE SFP management port of the switching control unit |
|
Table 1 Card specifications
|
Item |
Specification |
|
Processor |
· Switching control unit: MIPS64 (four cores), 1.2 GHz · X86 server unit: Intel Xeon E5-26xx V3, 2.6 GHz |
|
SDRAM |
· Switching control unit: 16 GB DDR3 SDRAM (two DIMM slots) · X86 server unit: 64 GB DDR4 SDRAM (four DIMM slots) |
|
Flash |
· Switching control unit: 1 GB (NAND flash) · X86 server unit: ¡ 256 GB (SSD) ¡ 4 GB (NAND flash, for the BMC service) ¡ 4 GB (NAND flash, for the USB service) |
|
NVRAM |
· Switching control unit: 512 KB · X86 server unit: 1 MB |
|
Power consumption |
107 W to 183 W |
|
Connector |
· RJ-45 · LC · Type A USB |
|
Ports |
· 2 × 10/100/1000BASE-T management port for the switching control unit · 2 × GE SFP management port for the switching control unit · 1 × USB port for the X86 server unit · 1 × BMC port for the X86 server unit · 1 × 10/100/1000BASE-T port for the X86 server unit · 2 × 10GE SFP+ port for the X86 server unit · 1 × console port for the switching control unit |
|
Transmission rate |
· Console port: ≤ 115200 bps (default: 9600 bps) · 10/100/1000BASE-T port: 10/100/1000 Mbps · SFP port: 1000 Mbps · SFP+ port: 10 Gbps · USB port: 480 Mbps · BMC port: 10/100/1000 Mbps |
|
Transmission medium and max transmission distance of the console port |
15 m (49.21 ft) over asynchronous serial cables. |
|
Transmission medium and max transmission distance of the 10/100/1000BASE-T port |
100 m (328.08 ft) over Category 5 twisted pair cables. |
|
Transmission medium and max transmission distance of the BMC port |
100 m (328.08 ft) over Category 5 twisted pair cables. |
|
Compatible device models |
· S12516X-AF · S12512X-AF · S12508X-AF |
|
|
IMPORTANT: · To verify compatibility of the card with the software release you are using, see the release notes. · The USB port supports only USB 2.0 devices. It cannot identify a non-USB 2.0 device. · For information about transceiver modules and cables available for the card, see H3C S12500X-AF Switch Series Cards and Transceiver Modules Compatibility Matrixes. |
4 Installing the card
1. Insert the card into the MPU slot.
2. Hold the card by the front panel with one hand and support its bottom with the other, and then gently push it into the slot along the guide rails.
3. Rotate in the ejector levers until the ejector levers attach to the front panel of the card.
4. Tighten the captive screws.
5 Accessing the card for the first time
The card uses an independent operating system. Before you can configure the card, you must log in to the card by using one of the following methods:
· Log in to the switching control unit through the console port to complete network configuration. For more information about using the console port for first-time access, see H3C S12500X-AF Switch Series Configuration Guide.
· Log in to the Web interface of the X86 server unit by connecting your network cable to the BMC port to complete server configuration.
The label on the card provides the default IP address, username, and password for accessing the X86 server unit. You can use this information to access the X86 server unit through your browser.
6 Installing the operating system
The card is installed with the CentOS operating system before delivery. For more information about the CentOS operating system, see the configuration guide for the operating system.
The X86 server unit can operate correctly only when a compatible operating system is installed. Contact H3C sales representative or H3C Support for the compatible operating systems for the X86 server unit.
7 Related documentation
For module installation, see H3C S12500X-AF Switch Series Installation Guide.
For software upgrade, see the release notes for the device.
Copyright © 2018 New H3C Technologies Co., Ltd.
The information in this document is subject to change without notice.
